
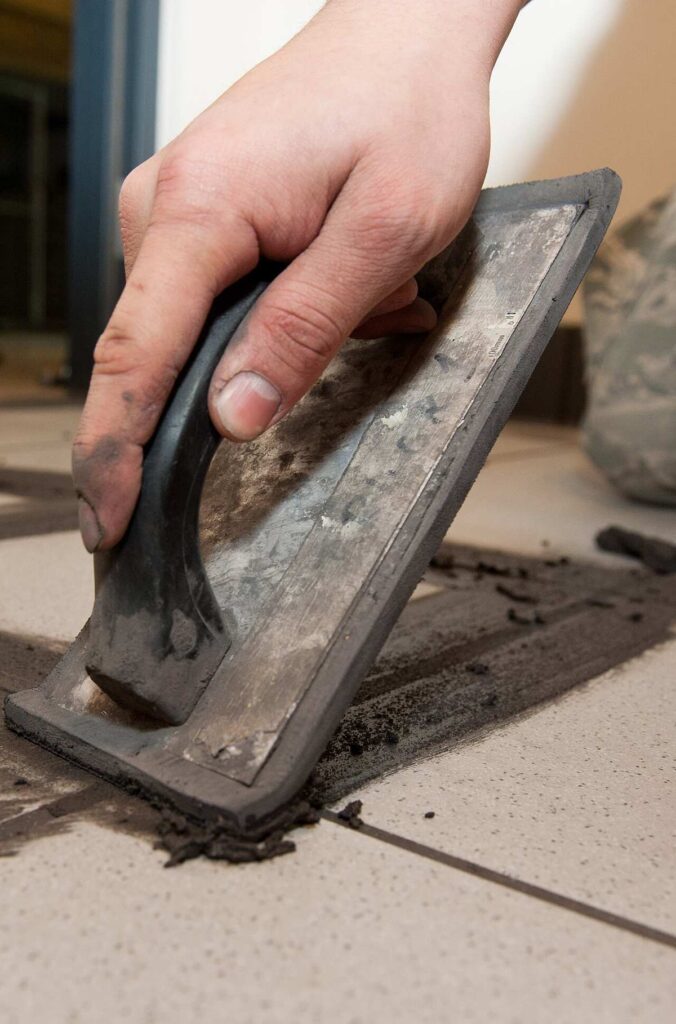
You laid the tile, the thinset has cured, and the layout looks sharp. Then you reach for a bag of grout and realize the part everyone treats as an afterthought is actually the part that decides whether the whole installation looks handmade or hand-built. Grout is the visible 5 percent of the job that people see and touch every day, and it is also the seam that keeps water, grit, and movement from working under the tile. Get the consistency, the float angle, the haze timing, and the cure right, and the joints hold their color and integrity for twenty years. Get them wrong and you are staring at pinholes, hazed tile, and cracked lines within a season. This guide walks through how to grout tile the way a professional crew does it, and where the small decisions quietly make or break the result.
This is grouting brand-new tile, not reviving old joints. If your existing grout is stained or crumbling, that is a different job with different tools, and the repair usually belongs inside a wider tile and stone flooring scope rather than a fresh bag of grout.
Key Takeaways
- Match grout to joint width first: unsanded for joints under 1/8 inch, sanded for 1/8 inch and wider. Using the wrong one is the most common cause of cracking or scratched tile.
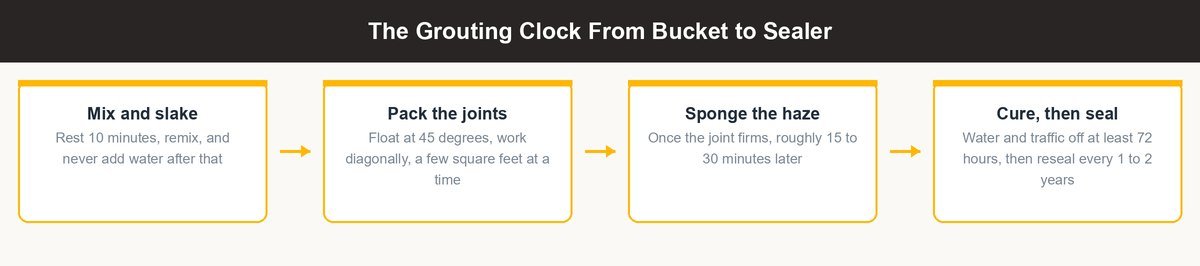
- Mix to a smooth peanut-butter consistency and let it slake for about ten minutes. Adding extra water to loosen a stiffening batch is the fastest way to weaken the joint and lighten the color.
- Hold the float at roughly 45 degrees and work diagonally across the joints so the rubber packs grout in instead of dragging it out.
- Haze timing is everything. Wipe too early and you pull grout out of the joints; wait too long and a stubborn film bakes onto the tile face.
- Cement grout needs sealing after it fully cures (typically 48 to 72 hours); epoxy grout is nonporous and needs no sealer.
What This Guide Covers
- Choosing the Right Grout Before You Open a Single Bag
- Mixing Grout to the Consistency That Actually Holds
- Working the Grout Into the Joints With the Right Float Angle
- Timing the Haze Wipe So You Do Not Undo Your Work
- Curing and Sealing So the Joints Last for Decades
- When to Bring in a Professional Instead
- Get Your Tile and Grout Done Right the First Time
- FAQs
Choosing the Right Grout Before You Open a Single Bag
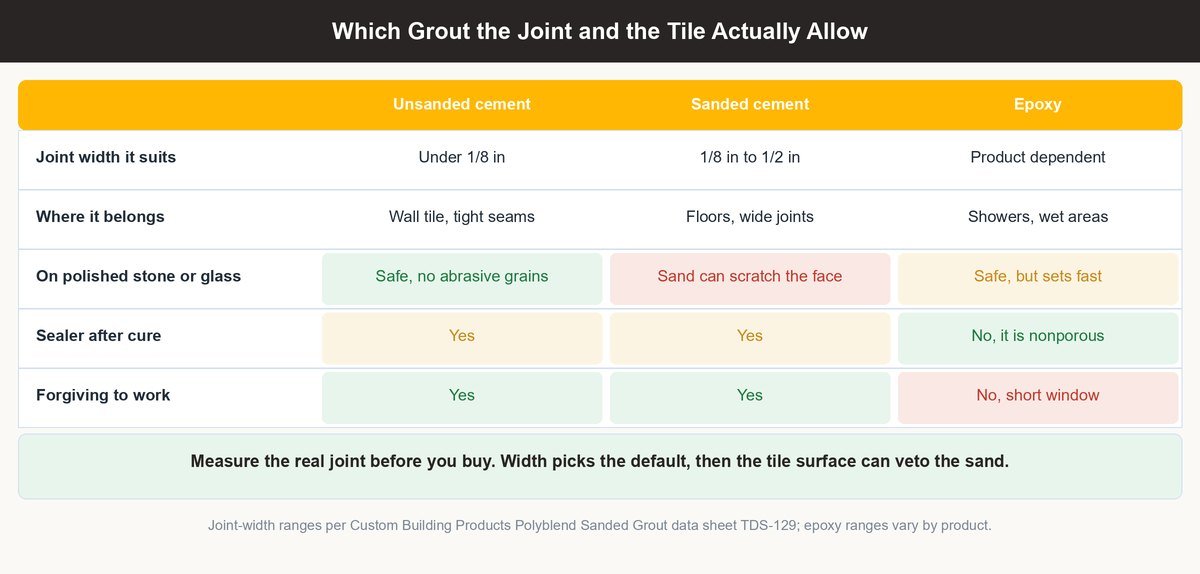
The single biggest decision happens before any grout touches the tile, and it is driven almost entirely by your joint width and where the tile lives. Sanded grout contains fine aggregate that gives it body and resists shrinkage cracking, which is exactly what wide joints need. Unsanded grout is smoother and stickier, so it clings to vertical joints and slips into hairline seams without the sand grains fighting the gap. Choose wrong and you either crack a wide joint filled with unsanded grout or you scratch a delicate tile face by dragging sand across it.
The table below is the fast reference professionals carry in their heads. Notice that material sensitivity, not just joint width, can override the default choice for stone and glass.
Sanded Versus Unsanded Grout by Joint Width
How Joint Width Decides It
The 1/8 inch threshold is not marketing, it is physics. In a joint wider than 1/8 inch, plain cement grout shrinks and cracks as it dries because there is too much paste and too little structure, so sand is added to hold volume and resist that shrinkage. In a joint under 1/8 inch the sand grains simply cannot fit cleanly, so unsanded grout is used to fill the tight seam. Measuring your actual tile spacing before buying beats guessing at the store; Custom Building Products rates its sanded grout for 1/8 inch to 1/2 inch joints and sends anything narrower to an unsanded product.
Why the Surface Material Matters
Beyond width, the tile itself can veto the sand. Polished marble, honed limestone, and glass mosaic scratch under the abrasive grains in sanded grout, and the scratches show permanently under bathroom lighting. That is why a wide-jointed marble floor is often grouted with unsanded or a specialty non-sanded formula despite the width, accepting a little extra crack risk to protect an expensive surface. When in doubt on natural stone, the tile supplier’s spec sheet is the tiebreaker.
Mixing Grout to the Consistency That Actually Holds
Consistency is the invisible variable that decides how strong and how evenly colored the finished joint will be. The goal is a mix that is thick enough to hold its shape but plastic enough to pack, and getting there is more about restraint with the water than muscle with the paddle.
Getting the Water Ratio and Slake Time Right
Aim for a Peanut-Butter Consistency
Add the powder to most of the water, not the water to the powder, and stop while the mix is thick enough to hold a soft peak on the margin trowel. It should smear cleanly without running off the tool. A soupy batch feels easier to spread but is full of extra water that evaporates and leaves the cured joint weak, porous, and noticeably lighter in color than the sample chip you chose.
Let It Slake, Then Remix
After the initial blend, let the grout rest for about ten minutes so the polymers and pigments fully absorb the water, then remix briefly before use. Skipping this slake step is a quiet mistake that leaves the batch grainy and inconsistent. Mixing by hand or with a slow paddle avoids whipping in air bubbles, which turn into pinholes on the joint surface later.
The one thing that will undo all of that care is reaching for the water jug once the batch starts to set.
Working the Grout Into the Joints With the Right Float Angle
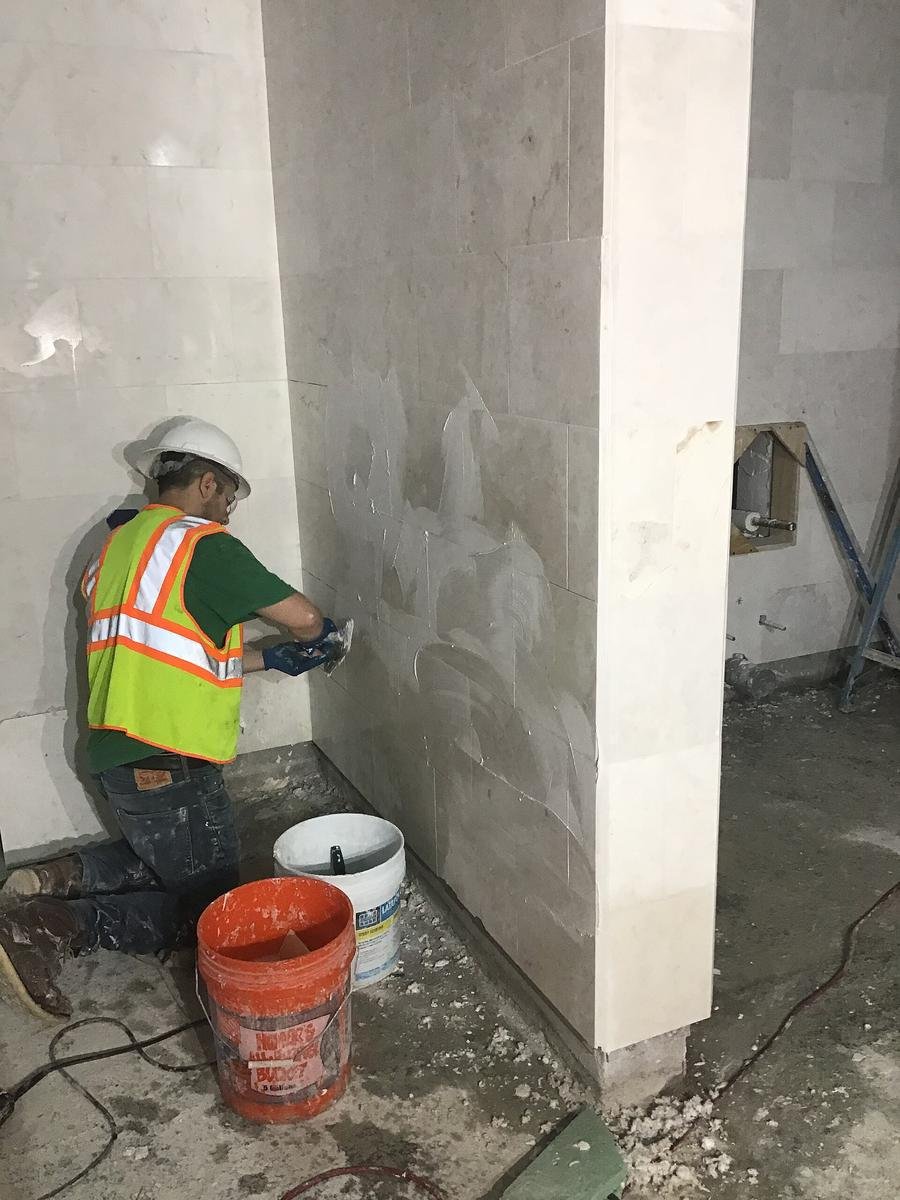
How you hold the float and how much floor you take on at once are the two habits that separate solid, fully packed joints from hollow ones that fail early. Both are simple to do once you understand what the tool is actually doing at the joint.
Two Passes That Fill a Joint Solid
Spread Flat, Then Pack at 45 Degrees
Scoop grout onto the tile and spread it across the joints holding the rubber float almost flat, then make a second pass holding the float at roughly a 45 degree angle and moving diagonally across the joint lines. The diagonal angle lets the float edge ride over the joint and press grout down into it rather than scooping freshly packed grout back out. Full, compacted joints are what keep water and dirt from finding a channel under the tile.
Work Small Sections and Keep Moving
Grout a manageable area at a time, roughly a few square feet, so the mix does not start to firm up on the tile before you can clean it. On a large floor this rhythm of pack a section, then wipe a section is what prevents a hazed, ruined surface. Chasing a whole room at once is how DIYers end up with grout curing rock-hard on the tile face.
The float angle you use for each of those two passes is worth calling out on its own.
Timing the Haze Wipe So You Do Not Undo Your Work

The cleanup wipe is where most first-time results fall apart, because the window is narrower than it feels. Wait until the grout has firmed in the joints, usually 15 to 30 minutes depending on temperature and humidity, then wipe the tile with a damp, well-wrung sponge in gentle circles. The sponge should shape and smooth the joints, not flood them.
Rinse the sponge often and change the water frequently, because a dirty sponge just smears thin grout film back across the tile. A final light buff with a dry microfiber cloth once the surface dries clears the last of the haze.
Curing and Sealing So the Joints Last for Decades
Fresh grout looks finished long before it actually is, and rushing the next steps is what shortens its life. Cement grout needs time to cure and dry before it is sealed or exposed to standing water, and epoxy grout follows a different path entirely because it is nonporous from the start.
How Long to Wait Before Sealing Grout
Give Cement Grout Its Full Cure
Most cement-based grouts need 48 to 72 hours to cure before sealing, \1; Custom Building Products, for one, asks that its sanded grout be protected for at least 72 hours. Cool, humid Bay Area bathrooms and coastal Alameda County homes can push cure times toward the long end because moisture in the air slows evaporation. Sealing too early traps moisture in the joint, which can cloud the sealer and leave the grout weaker than if you had simply waited.
Keep Water Off Until It Cures
Avoid mopping, showering on the new tile, or heavy foot traffic during the cure window, since standing water can wash pigment out and leave pale streaks. A newly grouted shower in an Oakland or Fremont remodel should stay dry for the full cure before anyone runs the water. Patience here costs a day or two and buys years of even color.
Why Epoxy Grout Skips the Sealer
Nonporous by Design
Epoxy grout is made of resins and a hardener rather than cement and water, so it does not absorb liquid and therefore never needs a penetrating sealer. That is a real advantage in showers, steam rooms, and stain-prone kitchen backsplashes where cement grout would need resealing every year or two. The tradeoff is that epoxy sets fast, is less forgiving to work, and costs more, which is why many homeowners hand wet-area epoxy work to a pro.
Cement grout, by contrast, keeps demanding attention long after the tile is in use, which is where the resealing schedule below comes in.
When to Bring in a Professional Instead
Grouting a small backsplash or a powder-room floor is a reasonable weekend project. Grouting a large-format porcelain floor, a curbless shower, a natural-stone installation, or any wet area where a hidden leak becomes an expensive callback is where professional experience pays for itself. A pro reads the joint width, the material, and the moisture exposure at a glance, mixes and paces the work so nothing hazes, and knows when epoxy is worth its difficulty. That judgment is also why the right tile and stone choices matter upstream; our guide on porcelain versus natural stone for high-moisture showers pairs naturally with getting the grouting right.
If your project is a full flooring installation rather than a single room, the grouting is one step inside a larger sequence. Our Bay Area flooring installation guide lays out how the whole job fits together from subfloor to finished joints.
Get Your Tile and Grout Done Right the First Time
A tile job is only as good as its joints, and the difference between a floor that looks handmade and one that lasts for decades comes down to the details covered here. If you want the layout, waterproofing, and grouting handled by a licensed crew that gets the small decisions right, contact Top Tier Building Services (CSLB #1146790) for your Bay Area flooring or bathroom project.
FAQs
Do I need to seal grout after grouting tile?
Cement-based grout should be sealed after it fully cures, usually 48 to 72 hours, because it is porous and will otherwise absorb water and stains. Epoxy grout is nonporous and does not need sealing. Cement grout in wet or high-traffic areas benefits from resealing every one to two years.
How long should I wait before sealing new grout?
Wait until the grout has fully cured, which is typically 48 to 72 hours for cement grout, and always check your specific product’s bag for the exact time. Cool, humid conditions common in coastal Bay Area homes can extend the cure, so err toward the longer end before sealing.
What is the difference between sanded and unsanded grout?
Sanded grout contains fine aggregate that resists shrinkage cracking in joints 1/8 inch and wider, making it right for most floors. Unsanded grout is smoother and used for joints under 1/8 inch and for delicate surfaces like polished stone and glass that sand would scratch.
How do I mix grout to the right consistency?
Mix grout to a smooth, thick peanut-butter consistency that holds a soft peak and smears without running. Let it slake for about ten minutes, then remix briefly. Never add extra water to loosen a batch that is stiffening, because retempering permanently weakens the joint and lightens its color.
How do I grout floor tile without cracking the joints?
Use sanded grout for the wider joints typical of floors, pack it fully by holding the float at a 45 degree angle and working diagonally, and keep water off the floor for the full cure window. Full, compacted joints and an unhurried cure are what prevent cracking and pinholes.
When is the right time to wipe grout haze off the tile?
Wipe after the grout has firmed in the joints, usually 15 to 30 minutes after packing, using a damp, well-wrung sponge. Too early pulls grout out of the joints; too late lets a cement haze bond to the tile face and require a haze remover to clear.