Good residential lighting design is the difference between a house that looks like a real estate listing and a home that feels comfortable to live in. This Bay Area lighting design guide covers what good lighting actually is, the three-layer model professionals use, how to think about each room, the codes you have to follow in California, and the mistakes that cost homeowners the most. Done well, lighting is the cheapest, fastest, most visible upgrade you can make to a Bay Area home — and the one most owners get wrong. If your kitchen feels like an operating room, your living room is dim no matter what you do, and your bathroom mirror casts shadows under your eyes, none of that is your fault. It’s a design problem, and design problems are solvable.
What Residential Lighting Design Actually Is
Lighting design is the practice of choosing where light comes from, how much there is, what color it is, and how you control it — for every space in the home and every activity in those spaces. It’s not the same as picking out fixtures, though that’s part of it. It’s not the same as electrical work, though it depends on it. It’s the planning step that sits between architecture and finish work, and it determines whether a room reads as warm and considered or flat and institutional.
The reason most Bay Area homes feel poorly lit isn’t the wattage. It’s the layout. A 1950s Castro Valley ranch built with two recessed cans in the middle of the living room ceiling can never look right, no matter what bulbs go in. A 1980s tract home in Fremont with a single overhead fluorescent in the kitchen will always feel cold, even at 3000K. A modern remodel in Walnut Creek with thirty downlights set to full brightness will read like a showroom — and showrooms are not where people relax.
Good lighting design fixes these problems before the drywall closes. It coordinates with electrical, with cabinetry, with millwork, and with whatever smart controls you intend to live with for the next decade. Done right, you stop noticing the light and start noticing the room.
The Three-Layer Model: Ambient, Task, and Accent
Every professionally designed room uses three layers of light. Skip a layer and the room never quite works.
Ambient lighting is the base. It’s the wide, soft, general illumination that lets you walk through a room without bumping into furniture. In most homes, ambient comes from wide-beam recessed downlights (often a 60-degree or greater beam angle), surface-mount ceiling fixtures, or — in well-designed homes — daylight from properly placed windows. Ambient is what fills a room when you only have one switch on. It should never be the only layer working.
Task lighting is functional. Higher lumens, focused where you actually do things: under-cabinet LED strips over a kitchen counter, a pendant over a kitchen island, a reading sconce beside a bed, a vanity light at a bathroom mirror, a desk lamp in a home office. Task lighting solves specific problems — chopping vegetables without shadowing the cutting board, reading a book without straining your eyes, applying makeup with even light on your face.
Accent lighting is narrow-beam light aimed at something you want noticed. A picture light over artwork. A small spot highlighting a stone fireplace. A pair of in-ground uplights washing a Japanese maple in the front yard. The rule that most homeowners miss: accent lighting should be roughly three times brighter than the surrounding ambient light. If it’s the same brightness, the eye doesn’t read it as an accent — it just reads as more light.
For a much deeper walk-through of how to plan all three layers in a real room, see our guide on layered lighting design and how to plan ambient, task, and accent layers.
How to Think About Each Room Differently
The three-layer model is the framework. The application changes room by room.
The Kitchen
Kitchens need all three layers, more than any other room. Ambient comes from recessed cans on a grid (typically every 4 to 6 feet, 24 to 30 inches off the walls). Task lighting lives under the upper cabinets — continuous LED strips at around 3000K give you a clean working surface — and over the island, where pendants do double duty as task light and as the visual centerpiece of the room. Accent is optional but powerful: in-cabinet glass-front display lighting, toe-kick lighting for nighttime navigation, a small spotlight on a hood or a backsplash.
Common mistake: a single fluorescent or surface fixture in the center of the ceiling. The cook then stands between the light and the counter, casting their own shadow on the cutting board. Every kitchen we remodel gets this fixed.
Bathrooms
The single most important fixture in any bathroom is the vanity light, and the single most common mistake is putting it overhead. Overhead light puts harsh shadows under your eyes, your nose, and your jaw — it’s the lighting equivalent of holding a flashlight under your chin. Light at the mirror should come from either side at face height, or from a fixture across the top of the mirror with a diffuser. Sconces flanking the mirror at roughly 60 to 66 inches off the floor work in almost every Bay Area bathroom.
Add a separate ambient layer (a small recessed can or a flush mount), a dedicated shower light (wet-rated, low profile), and you’ve covered every realistic use of the room. For full-bath remodels we plan all of this during the bathroom remodeling design phase, before any tile gets ordered, because the wiring decisions are downstream of the fixture decisions.
Living Rooms and Family Rooms
These rooms suffer most from being treated as one big ambient space. The fix is layering: ambient from a combination of recessed cans and a few well-placed table or floor lamps, task light for any reading nook or work-from-home corner, and accent light on whatever the room is built around — fireplace, built-ins, art wall. A pair of matched table lamps on either end of a sofa adds more warmth than three additional ceiling cans.
Bedrooms
Bedrooms want the lowest ambient levels and the warmest color temperatures (2700K). Bedside lighting should be controllable from the bed — wall sconces with their own switches, or lamps on bedside tables. A central ceiling fixture is fine, but it should be on a dimmer and used sparingly. Closets often get forgotten and need their own task layer, ideally with motion sensors so you don’t have to find a switch with an armful of laundry.
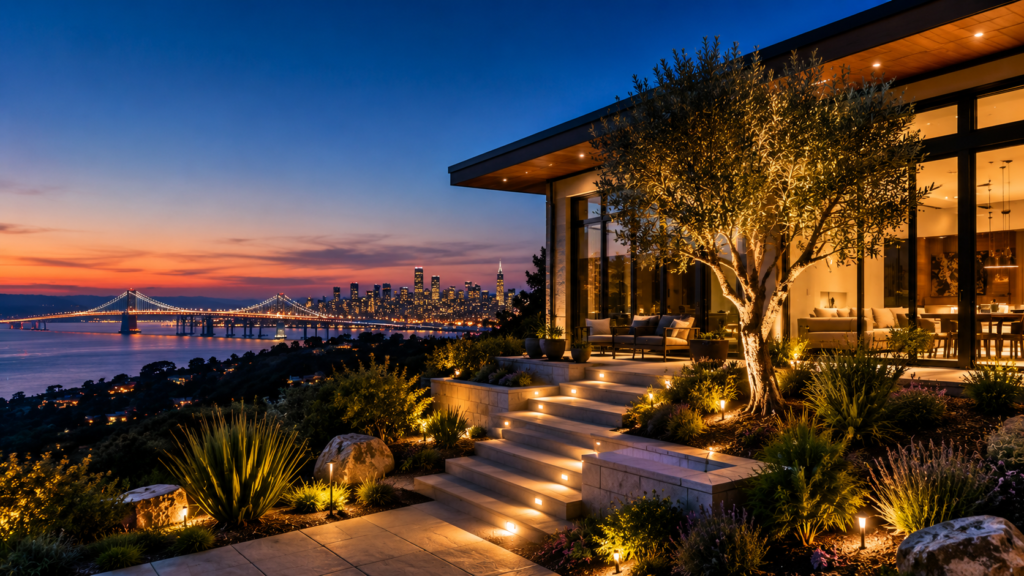
Outdoor
Bay Area weather makes outdoor lighting one of the highest-ROI upgrades for a home. Path lights, downlights from eaves washing the facade, uplights on landscape features, and step lights on any change in grade. Outdoor lighting also has safety implications — every porch, every rear door, and every set of exterior steps wants its own light source. Plan it together with landscaping and outdoor design and the result reads as one integrated project rather than two crews working past each other.
Color Temperature and Beam Angle Basics
Color temperature is measured in Kelvin (K), and it controls whether a room feels warm and residential or cool and clinical. The ranges that matter for a home:
- 2700K — warm, candlelight-adjacent. The default for residential. Bedrooms, living rooms, dining rooms.
- 3000K — warm-neutral. The sweet spot for most kitchens and bathrooms. Crisp enough to work under, warm enough to relax in.
- 3500K — neutral. Good for laundry rooms, garages, mudrooms.
- 4000K and above — cool, daylight-leaning. Workshops, garages, sometimes a home office. Almost never appropriate for primary living spaces.
A common mistake we see: a homeowner buys LEDs at the hardware store, doesn’t check the color temperature, ends up with a mix of 3000K, 4000K, and 5000K throughout the house. Each room then reads differently for no good reason. Pick a temperature per room and stick to it.
Beam angle is the spread of light leaving a fixture. Three useful ranges:
- Narrow (5 to 15 degrees) — accent lighting. A spot on a sculpture, an uplight on a tree, a picture light over art.
- Medium (25 to 40 degrees) — task lighting. A pendant over a kitchen island, a downlight over a desk.
- Wide (60 degrees or greater) — ambient lighting. The recessed cans that fill a room with general light.
Match the beam angle to the job. A narrow beam fills a room poorly; a wide beam can’t accent anything because the light bleeds everywhere.
Smart Controls: The Layer Most Homeowners Underuse
Putting every light source on a dimmer is the single biggest improvement most homes can make. Dimmers are cheap, the technology is mature, and the visual difference between a kitchen at 100 percent and a kitchen at 40 percent is the difference between cooking and dining. Most rooms benefit from being dimmable; bedrooms and living rooms especially.
Beyond dimmers, smart controls let you build scenes — preset combinations of multiple fixtures at specific levels. “Cooking” lights up the kitchen ambient and task layers at full; “Dinner” drops the kitchen to 30 percent and brings the dining pendant to 60. Whole-home systems (Lutron Caseta or RadioRA, Control4, Crestron) coordinate dozens of fixtures from one app or wall keypad.
The question isn’t whether smart controls are worth it — it’s which level of smart matches your home and your tolerance for technology. We cover that tradeoff in detail in our guide to smart lighting and electrical upgrades that are actually worth it in 2026.
The Cost Reality
Professional residential lighting design in the Bay Area runs a wide range. A consultation-only design for a single room might land between $500 and $1,500. A whole-home lighting plan integrated with a remodel can be $3,000 to $10,000 for design alone, with installed fixtures and labor adding $15,000 to $80,000 or more, depending on the size of the home, the fixture selections, and the complexity of the smart-control system.
What drives the price up: large fixture counts, specialty fixtures (custom pendants, architectural cove lighting, in-ground exterior fixtures with concrete work), whole-home smart-control systems, retrofitting in plaster ceilings or finished spaces where wiring has to be fished, and homes with knob-and-tube remnants that have to be replaced before any new circuit can be added.
What keeps the price down: planning the lighting during a remodel rather than after, using high-quality but standard fixtures rather than custom, choosing a smart system at the right scale (Lutron Caseta for a normal home; you don’t need Crestron unless you have a reason), and bundling the lighting work with adjacent trades so one crew isn’t waiting on another.
For a full breakdown of what you’ll actually pay, see our deep-dive on how much professional lighting design costs in the Bay Area.
Title 24 Compliance: What California Requires
California has the strictest residential lighting energy code in the country, and any homeowner adding or replacing permanent fixtures has to comply. The relevant section is Title 24, Part 6, §150.0(k) of the 2022 California Energy Code. Here is what it means in practice:
- All permanently installed luminaires must be high-efficacy (in practice, LEDs that meet specific lumen-per-watt and color-rendering thresholds, with JA8-listed sources).
- Kitchens must have at least 50 percent of the total installed wattage from high-efficacy sources. The other 50 percent can be lower-efficacy fixtures on a separate switch (for, e.g., decorative pendants), but most modern designs are 100 percent LED anyway.
- Bathrooms, garages, laundry rooms, and utility rooms must use high-efficacy lighting OR be controlled by a vacancy sensor (bathrooms) or motion sensor (garages, laundry, utility).
- Outdoor lighting attached to the building must be high-efficacy and controlled by either a motion sensor with photocell, or a photocell with an astronomical timer.
“Permanently installed” is broader than people expect. It includes lighting attached to walls, ceilings, or columns, track lighting, in-cabinet lighting, lighting integrated into ceiling fans and exhaust fans — basically anything that is not a plug-in lamp.
If your project involves changing a circuit, adding a fixture, or relocating an existing one, you need a permit and you need to comply. We pull every required permit on projects in our lighting design and electrical work — going around the permit process is how homeowners end up with insurance claims denied and resale disclosures complicated. (Top Tier holds CA General Contractor License #1146790, and we are bonded, insured, and workers’ comp covered.)
For the full plain-English breakdown of what Title 24 means for your specific project, see our guide to Title 24 lighting requirements for Bay Area homeowners.
Common Mistakes We See in Bay Area Homes
A few patterns repeat across nearly every home we walk into.
Too few fixtures, too much wattage per fixture. A single 100W-equivalent bulb in the middle of a 14-foot ceiling cannot light a room. Smaller fixtures spread across the ceiling beat one bright fixture in the middle, every time.
No dimmers. Even a $30 dimmer transforms a room. The cost of skipping dimmers is having to live with the room at one brightness forever.
Mismatched color temperatures. A 2700K table lamp next to a 4000K ceiling fixture looks wrong even if you cannot say why. Pick a temperature per room.
Vanity lighting overhead instead of at the mirror. A consistent flaw in 1950s and 1980s bathrooms. Easy to fix during a remodel.
Knob-and-tube remnants in pre-1950s homes. Common in older Berkeley, Oakland, and Alameda homes. Do not add new circuits to old knob-and-tube. Replace it, then design the lighting. This is structural electrical work that often surfaces during a full house renovation — the lighting design depends on the electrical infrastructure being sound first.
Treating lighting as a finish-stage decision. By the time the drywall is up, your options are limited. Lighting belongs in the planning phase, with the framing and the rough electrical.
Common Questions About Bay Area Lighting Design
What Is Residential Lighting Design?
Residential lighting design is the practice of planning where light sources go, how bright they are, what color they are, and how they are controlled — across every room of a home. It coordinates with electrical, architecture, and finish work. A professional design pairs ambient, task, and accent lighting layers in each room and ensures the result meets California’s Title 24 energy code.
How Much Does Professional Lighting Design Cost in the Bay Area?
A single-room consultation runs roughly $500 to $1,500. Whole-home lighting design integrated with a remodel runs $3,000 to $10,000 for design alone, with fixtures and installation typically adding $15,000 to $80,000 depending on home size, fixture selections, and the level of smart-control integration.
What Is the Difference Between Ambient, Task, and Accent Lighting?
Ambient lighting is general illumination that fills a room — usually from wide-beam recessed downlights or daylight. Task lighting is focused, higher-lumen light for specific activities like cooking or reading. Accent lighting is narrow-beam light aimed at a feature you want to highlight, and it should be roughly three times brighter than the surrounding ambient light to register as an accent.
Do I Need a Permit for New Lighting in California?
In most cases, yes. Replacing a fixture in an existing location with the same type generally does not require a permit, but adding a new circuit, relocating a fixture, installing recessed cans where none existed, or any work involving the electrical panel will require one. California’s Title 24 energy code applies to any permanently installed fixture in a residence.
What Color Temperature Is Best for a Home?
2700K is the default for most residential spaces — bedrooms, living rooms, dining rooms. 3000K works well for kitchens and bathrooms where you want a slightly crisper light. Avoid 4000K and above in primary living spaces; those cooler temperatures read as commercial or clinical and do not pair well with most residential finishes.
Planning Your Lighting Project
A well-lit home does not happen by accident, and it almost never happens by buying fixtures off the shelf and hoping. It happens because someone — designer, builder, or both — thought about each room before any wires were pulled. If you are planning a remodel, a renovation, or even a single-room refresh, the right time to think about lighting is now, while choices are still cheap to change. Top Tier Building Services Inc. handles lighting design integrated with our design-build work across the Bay Area, and we would welcome the chance to walk through what your home needs before any decisions get locked in.
────────────────────────────────────────────────────────────
By Top Tier Building Services Inc.
Licensed Bay Area general contractor (CA License #1146790) serving homeowners, HOAs, and property managers from Castro Valley. Top Tier delivers design-build, renovation, and maintenance services across 14 specialty trades.