
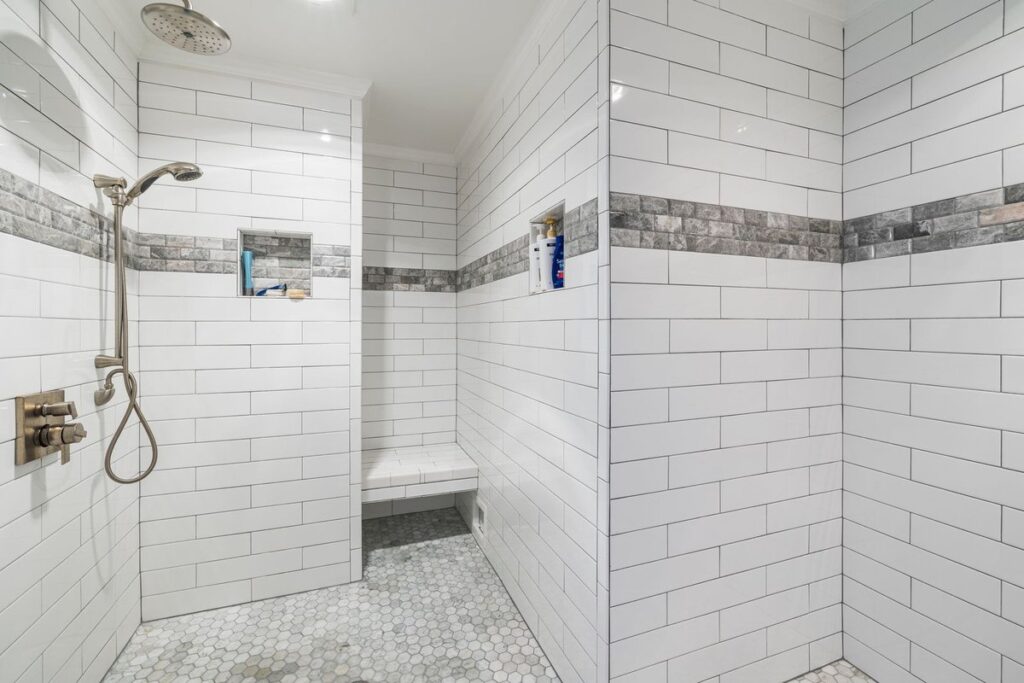
Almost every leaking shower we are called out to fix has the same story behind it. The tile looks fine. The grout looks fine. The homeowner did everything a weekend video showed them: buttered the back of each tile, kept the lines straight, sponged the haze off. And six months later the ceiling in the room below has a brown ring in it. The problem was never the tile you can see. It was the pan underneath it, which is a completely different job than the walls, governed by different rules, and it is where nearly every DIY shower fails.
Tiling a shower floor is not “tiling, but on the ground.” A shower floor has to do something no other tiled surface does: it has to shed water two ways at once. Water runs off the surface toward the drain, but water also soaks through the grout, saturates the setting bed, and has to be carried out below the tile by a waterproofing layer that most people don’t even know is supposed to be there. Get the invisible half wrong and the visible half is just a lid on a slow disaster.
This guide walks through the shower floor specifically, in the order you actually build it: the sloped pan, the waterproofing, why the tile has to be small, and how the drain you pick changes everything above it. If you are also tiling the walls, that is a separate process with its own sequence, and it comes after the floor is watertight. Top Tier Building Services Inc. (CSLB License #1146790) builds and repairs tiled showers across the Bay Area, and the pattern is consistent: the showers that last are the ones where the pan was treated as a plumbing assembly, not a decorating step.
Key Takeaways
- The shower floor is a layered plumbing assembly, not a flat surface. A code-compliant pan slopes toward the drain at 1/4 inch per foot (TCNA B415 / ANSI A108.1A), and that slope has to exist on two separate levels, not just under the tile.
- Traditional mortar-bed pans need a pre-slope under the waterproofing liner. Skipping it is the single most common failure. Water that passes through the grout collects on a flat liner with nowhere to go and turns the pan into a sponge.
- Tile choice is dictated by geometry, not looks. A center drain forces a four-way slope, so the floor tile must be small (mosaic, roughly 2 inches or under) to conform. Large-format tile needs a linear drain and a single-plane slope.
- The waterproofing method and the drain have to be a matched system. A sheet liner uses a clamping (weep-hole) drain; a bonded topical membrane like Kerdi uses a bonded-flange drain. Mixing them is how “waterproofed” showers still leak.
- Pooling water, efflorescence (white haze), and a musty smell are not cosmetic quirks. They are the early symptoms of a slope or waterproofing defect, and they only get worse.
What This Guide Covers
- Why a Shower Floor Is a Different Job Than the Walls
- How to Build a Sloped Shower Pan Correctly
- Waterproofing the Pan So It Actually Stays Dry
- Choosing the Best Tile for a Shower Floor
- How the Drain Layout Changes the Whole Floor
- What Goes Wrong When the Floor Is Tiled Wrong
- Build a Shower Floor That Outlasts the Remodel
- FAQs
Why a Shower Floor Is a Different Job Than the Walls
Shower walls keep water out by shedding it downward across a waterproof plane; gravity does most of the work and any water that gets behind the tile drains down to the pan. The floor has no “down” to send water to except the drain itself, and it sits in standing water every time the shower runs. That single difference is why the floor is built first, built differently, and is unforgiving of shortcuts.
The other reason the floor is its own discipline: it is the terminal point of the entire waterproofing system. Every drop that runs down a wall, every bit of moisture that wicks through floor grout, all of it ends up in the pan and has to exit through one fitting. A wall can tolerate a minor imperfection because water keeps moving past it. The pan is where water stops and waits, so any flaw in slope or waterproofing gets tested continuously, for years.
How to Build a Sloped Shower Pan Correctly
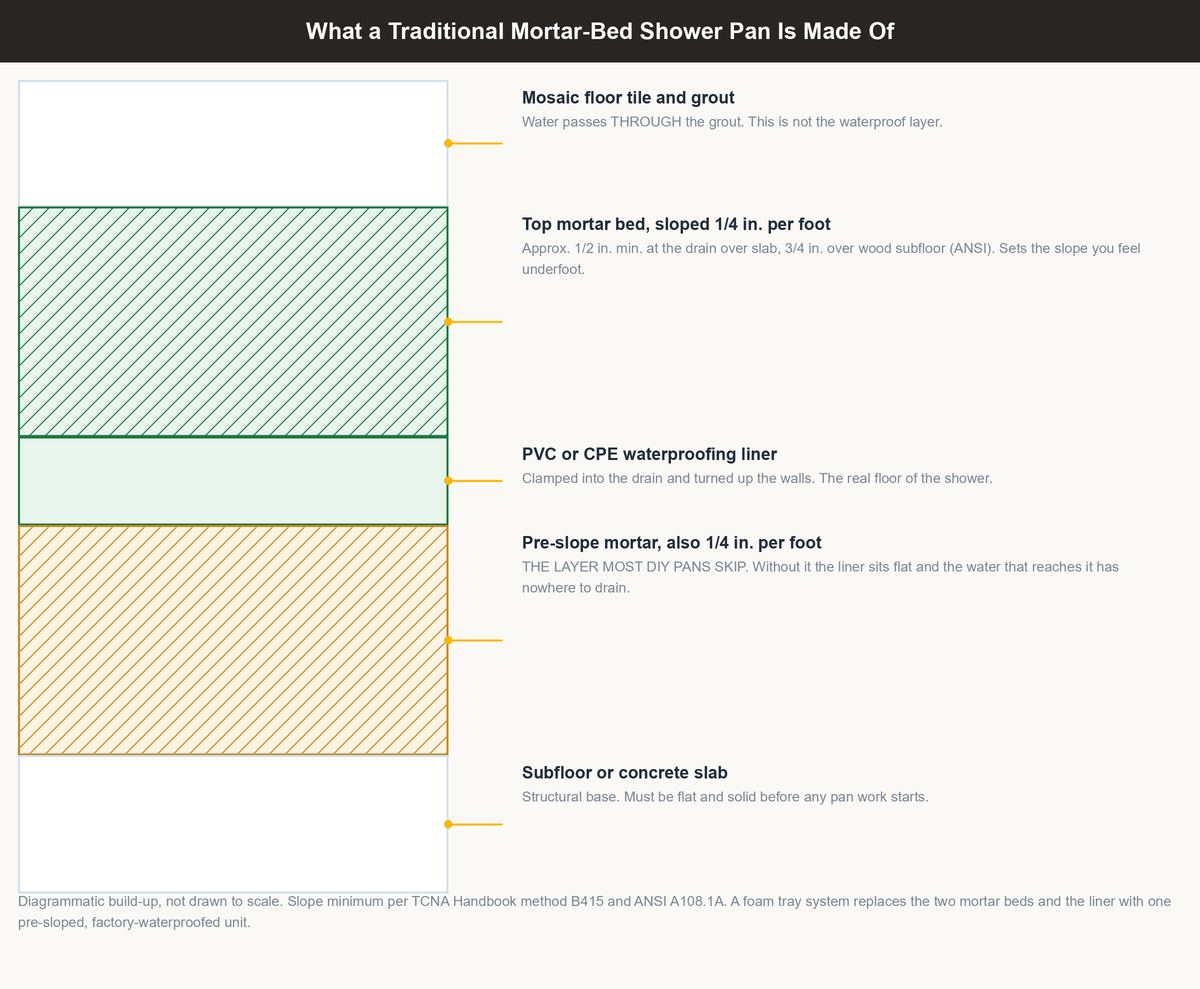
There are two legitimate ways to build the pan today: the traditional mortar bed with a sheet liner, and a pre-formed foam tray system. They achieve the same goal, a floor that slopes to the drain and is waterproof, but they get there differently and fail differently.
The Pre-Slope Is the Layer People Skip
What It Is
In a traditional mortar-bed pan, the first sloped mortar layer goes down under the waterproofing liner, not on top of it. It establishes 1/4 inch per foot of fall from the walls to the drain before the liner is even installed. Only after it cures does the PVC or CPE liner get laid over it and clamped into the drain.
Why It Matters
Water passes through grout. It always has. When it reaches the liner, that liner is the real floor of the shower, and if the liner sits dead flat, the water it collects has nowhere to run. It pools, saturates the mortar, and eventually finds the smallest gap. The pre-slope carries that hidden water to the drain’s weep holes. A pan built without a pre-slope can pass a flood test on day one and still rot out in two years, which is exactly why it fools so many DIYers.
The Top Mortar Bed Carries the Tile
What It Is
After the liner is in and the drain’s upper flange is set, a second mortar bed goes on top of the liner, also sloped at 1/4 inch per foot, thick enough to bury the liner and give the tile a solid, correctly pitched base. Minimum thickness at the drain is roughly 1/2 inch over a concrete slab and 3/4 inch over a wood subfloor, per ANSI.
Why It Matters
This is the layer the tile actually bonds to, so its slope becomes the surface slope you feel underfoot. If this bed is flat or wavy, the tile will pool no matter how good the layers below it are. Two sloped beds, one under the liner and one over it, are what a real mortar pan is, and it is why the job is skilled labor rather than a kit.
Foam Trays Trade Skill for Speed
What It Is
Pre-formed polystyrene trays (Schluter Kerdi-Shower, wedi, and similar) come from the factory already sloped to the drain. You set the tray in thinset, waterproof the joints and drain connection per the manufacturer, and tile directly onto it, no mortar-bed float required.
Why It Matters
A foam tray removes the highest-risk, most skill-dependent step, floating a correct compound slope by hand, so it is the more forgiving path for a homeowner or a crew that doesn’t build pans daily. The trade-offs are cost and rigidity: trays are more expensive per square foot, come in fixed sizes and drain locations, and any deviation (a non-standard footprint, an off-center drain) either isn’t possible or pushes you back to a custom mortar bed.
Waterproofing the Pan So It Actually Stays Dry
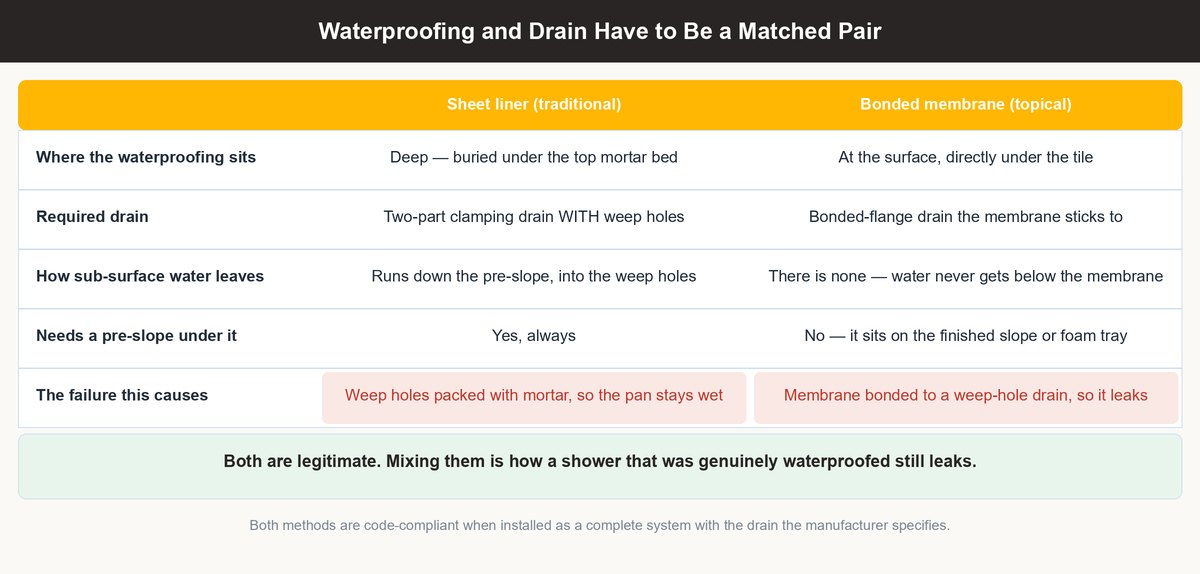
Waterproofing is where the “matched system” rule lives, and where a lot of otherwise careful jobs quietly fail. There are two families of waterproofing, and each one requires its own specific drain. You do not get to mix and match.
Sheet Liners Use a Clamping Drain
What It Is
The traditional method drapes a flexible PVC or CPE membrane over the pre-slope, up the walls several inches, and clamps it into a two-part drain with weep holes. The weep holes are the whole point: they let the water that collects on the liner enter the drain from below the tile.
Why It Matters
Because the waterproofing is buried deep under the top mortar bed, the drain has to collect water at two levels, the surface and the liner. That is what the weep holes and the clamping ring do. Cover those weep holes with mortar (a classic mistake) and the sub-surface water is trapped, and the pan stays wet indefinitely.
Bonded Membranes Use a Bonded-Flange Drain
What It Is
The modern topical method waterproofs at the surface, directly under the tile, with a bonded sheet membrane (Kerdi) or a liquid membrane (RedGard, Hydro Ban) applied over the sloped bed or foam tray. It pairs with a bonded-flange drain that the membrane adheres to, creating one continuous waterproof plane right beneath the tile.
Why It Matters
Because the waterproofing is at the surface, water never reaches a deep setting bed at all, so there are no weep holes and no buried mortar to stay wet. But this only works if the membrane bonds continuously to a matching bonded-flange drain. Drop a bonded membrane onto a clamping-style weep-hole drain and you have two systems fighting each other and a guaranteed leak.
Whichever system you choose, the same corner decides whether it holds.
Choosing the Best Tile for a Shower Floor
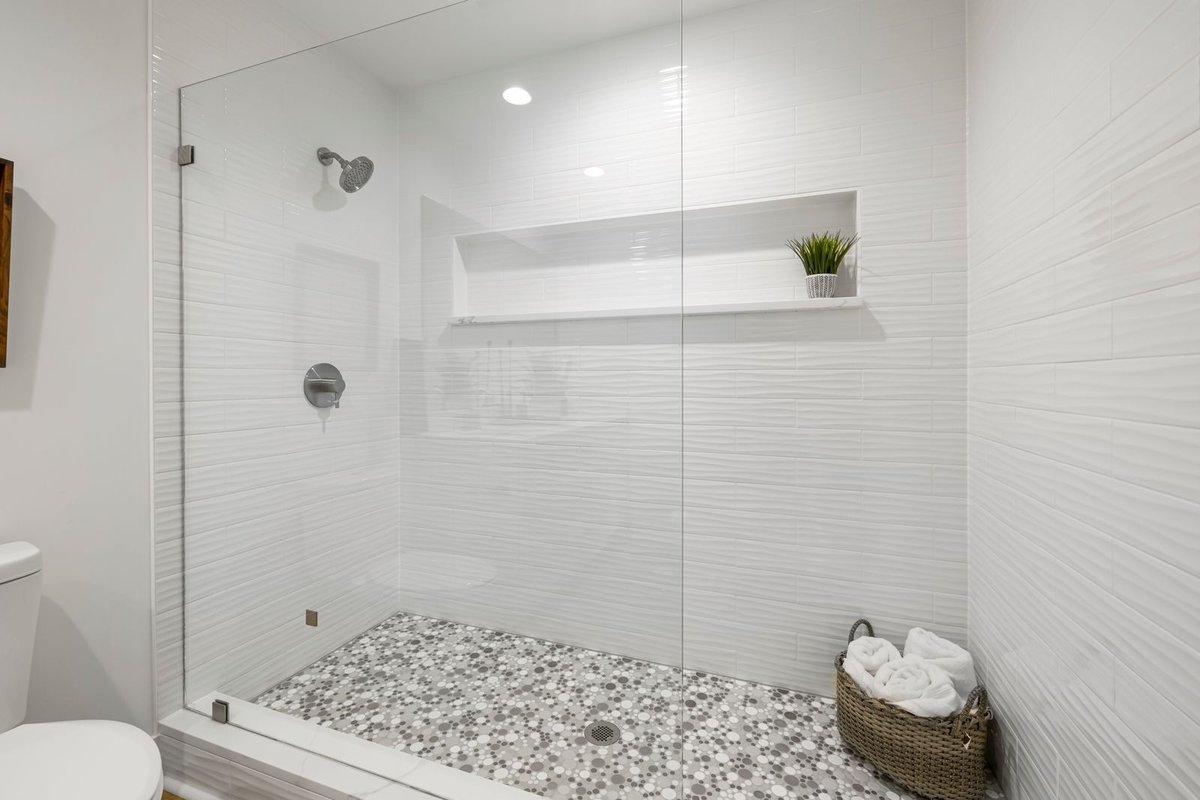
Here is the part homeowners get backwards: on a shower floor, the tile follows the slope, not your taste. The geometry of the drain decides what size tile can physically sit flat, and picking the wrong size is why so many floors end up with lippage, cracked corners, and puddles.
Why Small Mosaic Tile Wins on a Sloped Floor
What It Is
Shower floors are almost always mosaic, roughly 2 inches or smaller, sheet-mounted so a dozen little tiles set at once. Penny rounds, hex, and 1- to 2-inch squares are the standard for a reason.
Why It Works
A center-drain floor slopes four different directions at once, a shallow pyramid draining to the middle. A small tile is short enough that each piece can pivot slightly on its own patch of that compound slope and still sit flush, while the many grout lines flex to absorb the pitch. The plumbing-code 1/4-inch-per-foot slope will generally accommodate tile up to about 3 by 3 inches; beyond that the corners lift. As a bonus, all those grout lines add traction, which matters most on the one surface you stand on wet.
Why Large-Format Floor Tile Fails Without a Linear Drain
What It Is
Big-format tile (12 inches and up) is rigid and flat; it cannot bend to a compound slope. On a four-way center-drain pyramid, the corners of a large tile bridge the slope and rock, leaving hollow spots and lippage.
Why It Matters
Large tile only works on the floor if the floor slopes in one direction, and that requires a linear drain against a wall. If a client wants to carry a large-format wall tile straight onto the floor for a seamless look, that is a valid design, but it dictates a linear drain and a single-plane pan from the outset. You choose the drain and the tile together, at the design stage, or you fight them for the life of the shower.
Size is only half the decision; material is the other half.
How the Drain Layout Changes the Whole Floor
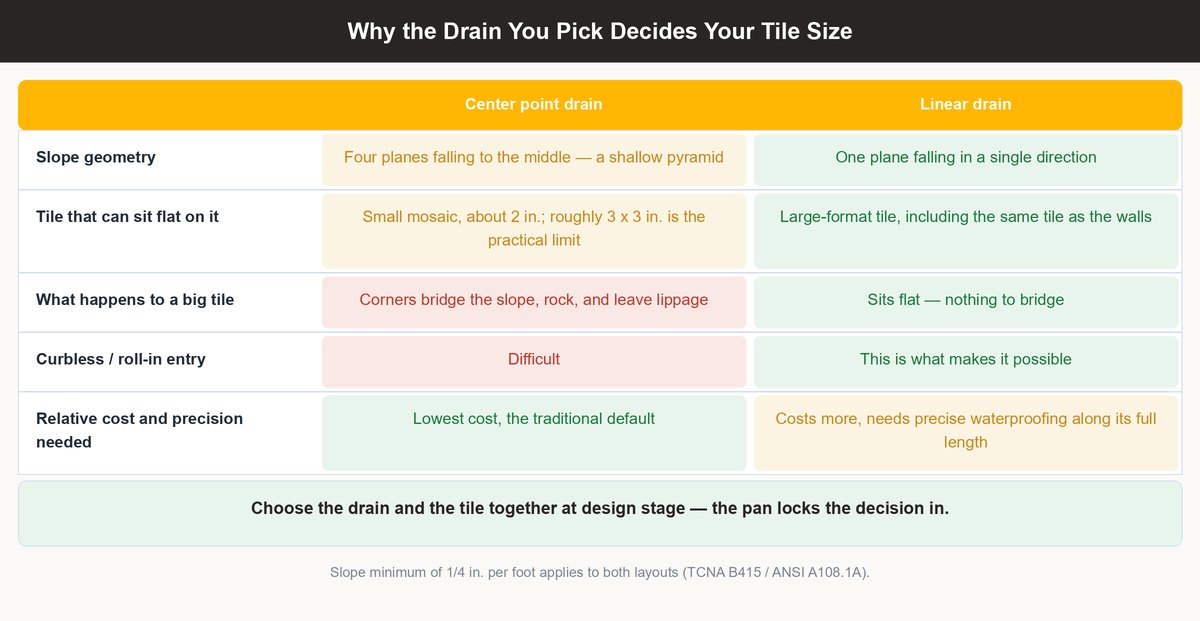
The drain is not a fixture you add at the end; it is the decision that dictates the slope, the tile size, and the look of the entire floor. There are two layouts, and they are not interchangeable after the pan is built.
A center drain is the traditional, economical default, and it is why mosaic floors are everywhere: the four-way slope demands small tile. A linear drain lets the floor tilt in a single direction, which is what makes large-format and curbless, roll-in showers possible, and it is increasingly the choice in aging-in-place and accessible Bay Area remodels because it removes the curb entirely. The linear option costs more and demands precise waterproofing along its full length, but it is the only way to get a big-tile, single-slope floor.
What Goes Wrong When the Floor Is Tiled Wrong
Every shower-floor failure traces back to one of three defects, and each announces itself before the ceiling below stains. Reading the symptoms early is the difference between a grout touch-up and a full tear-out.
Pooling or standing water after the shower is off means the slope is wrong, too flat, uneven, or actually pitched away from the drain in spots. Water that doesn’t leave sits on the grout, breaks it down, and drives moisture into the bed. A white, crusty haze creeping up from the grout, efflorescence, is dissolved minerals left behind by water constantly moving through a saturated pan; it is a direct signal that water is getting into the bed and not draining out. And a persistent musty or mildew smell that returns no matter how much you clean means water is trapped below the tile where you cannot reach it, feeding mold in the setting bed. As the EPA puts it, the key to mold control is moisture control, so no amount of cleaning fixes a pan that stays wet.
The reason these matter beyond the ick factor: the fix for all three is the same, and it is expensive. You cannot re-slope or re-waterproof a pan from the top. The tile, the bed, and often the liner all come out, back to the subfloor, and the pan is rebuilt from scratch. That is the true cost of a skipped pre-slope or a mismatched drain, and it is exactly why the pan deserves more care than any other surface in the bathroom. For the full waterproofing logic behind a wet floor, our guide on protecting a wet room from mold and structural failure goes deeper on the assembly.
Build a Shower Floor That Outlasts the Remodel
A tiled shower floor is one of the few surfaces in a home where a hidden mistake guarantees an expensive, disruptive repair down the line, and where doing it right is almost entirely invisible. That is exactly why it pays to have someone who builds pans for a living get the slope, the waterproofing, and the drain-to-tile match correct the first time. Top Tier Building Services Inc. (CSLB License #1146790) builds mortar and foam-tray shower pans, installs both center and linear drains, and handles the framing changes a curbless shower needs, as part of our full bathroom remodeling service across Oakland, Fremont, San Jose, and the wider Bay Area. For the technical standard behind everything above, the Tile Council of North America (TCNA) publishes the installation methods professional tile setters build to. Call 510-470-1870 for a free consultation, or contact Top Tier Building Services to plan your shower the right way from the pan up.
FAQs
What slope does a shower floor need?
A shower floor must slope toward the drain at a minimum of 1/4 inch per foot, measured from the farthest wall to the drain, per the TCNA Handbook (method B415), ANSI A108.1A, and the plumbing code. The slope should not exceed roughly 1/2 inch per foot, or the floor feels steep and tiles are hard to keep flat. In a traditional mortar pan this slope has to exist on two layers: the pre-slope under the waterproofing liner and the mortar bed above it.
Can you tile a shower floor with large tiles?
Only if the floor uses a linear drain and slopes in a single direction. A standard center drain creates a four-way pyramid slope that large, rigid tiles cannot conform to, so their corners lift and rock. That is why center-drain floors use small mosaic tile (about 2 inches or under) and large-format floors require a linear drain and a single-plane pan, decided at the design stage.
Do I need a pre-slope under the shower pan liner?
Yes, in a traditional mortar-bed pan. The pre-slope is a sloped mortar layer installed under the waterproofing liner so that water which soaks through the grout and reaches the liner still drains to the drain’s weep holes. Skipping the pre-slope leaves the liner flat, traps water in the pan, and is the single most common cause of a shower that passes an initial test but leaks or grows mold within a year or two.
What is the difference between a linear drain and a center drain for tile?
A center drain sits in the middle of the floor and requires a four-plane slope, which limits you to small mosaic tile. A linear drain is a long channel, usually against a wall or at the entry, that lets the whole floor slope in one direction, so it can take large-format tile and enables curbless, walk-in showers. The linear drain costs more and needs precise waterproofing along its length but is the only route to a big-tile, single-slope floor.
Should I tile the shower floor or the walls first?
Build and waterproof the floor pan first, and flood-test it before any wall tile goes up. The pan is the terminal point of the entire shower’s waterproofing, and the wall waterproofing needs to lap over the pan’s, so the floor assembly has to be complete and proven watertight first. Tiling the walls before confirming the pan holds water risks demolishing finished work to fix a leak.