In luxury bathroom design, a wet room represents the pinnacle of clean, barrier-free aesthetics. However, removing the traditional shower curb exposes the entire room to continuous moisture, turning your floor and walls into a primary water management system. Without an industrial-grade waterproofing strategy, microscopic moisture will bypass your finishes, destroying subfloors, rotting framing lumber, and fueling toxic mold colonies behind the scenes.
True luxury is more than skin deep; it is defined by the invisible engineering that keeps structural elements completely dry. Before choosing your tile finishes or shifting your core layouts, establishing an optimized spatial layout via proper custom bathroom design and space planning is essential to map your plumbing and drainage pathing accurately. This guide explores advanced waterproofing architectures, evaluating the systems and execution standards required to safeguard your home against catastrophic water damage.
1. The Critical Failure Points in Modern Wet Rooms
Water possesses an extraordinary ability to find the path of least resistance through capillary action. In a curbless shower or open wet room layout, there are three non-negotiable vulnerability zones that require specialized mechanical intervention:
• The Wall-to-Floor Junction (The Change of Plane): As a home naturally settles, different structural planes shift independently. Standard grout lines will crack at these intersections, allowing water to seep straight into the framing. These transition points require elastomeric bands or structural reinforcing tape to absorb movement without tearing the waterproof barrier.
• The Drain Assembly Connection: The interface where the floor membrane meets the linear or point drain flange is highly susceptible to leaking. A failure to achieve a seamless, chemically bonded seal here guarantees subfloor saturation.
• Fastener Penetrations: Every screw used to secure cement backer boards or drywall creates a puncture pathway. If a surface-applied shower surround waterproofing system isn’t installed over these fasteners, moisture will migrate down the screw threads directly into wood or steel studs.
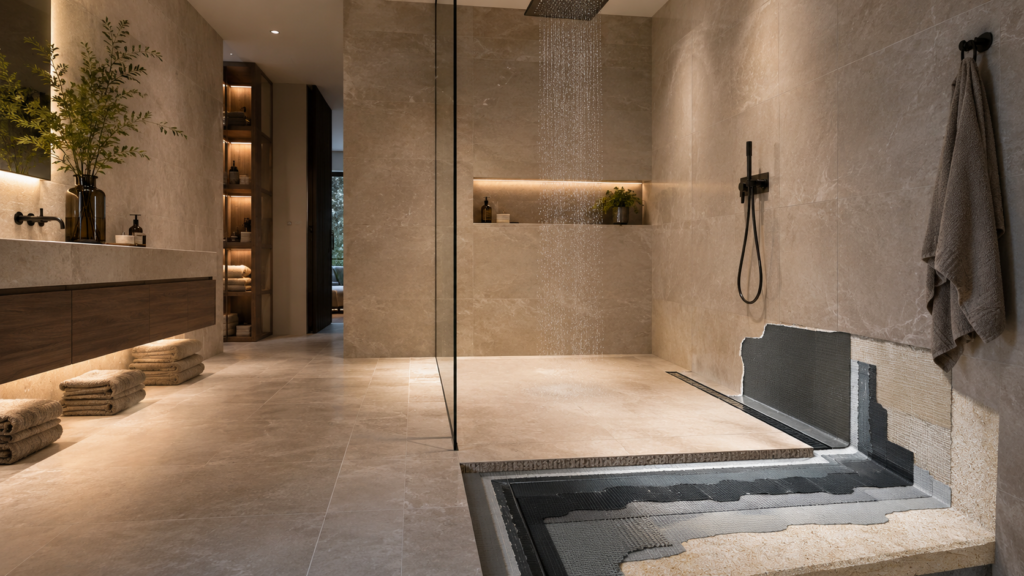
2. Comparing Waterproofing Systems: Liquid vs. Sheet Membranes
To protect your infrastructure and permanently address how to stop mold behind shower tile, professional design-build teams skip porous retail barrier alternatives and build a continuous water management envelope using one of two primary architectural-grade systems:
| System Type | Material Composition | Application Advantages | Primary Risk Factor |
| Liquid-Applied Membranes (e.g., AquaDefense, RedGard) | Advanced elastomeric polymers painted or rolled onto substrates. | Creates a completely seamless, continuous monolithic coat; excellent for complex, curved geometries. | Vulnerable to installer error regarding dry-film thickness (must meet a minimum of 20–30 mils wet). |
| Sheet-Applied Membranes (e.g., Schluter-KERDI) | Pliable polyethylene sheets with anchoring fleece laminated on both sides. | Guarantees uniform thickness across the entire installation; exceptional vapor management for steam. | Requires flawless coverage of thin-set mortar under the sheet; seams must overlap by a strict minimum of 2 inches. |
In premium master suites featuring multi-head spa fixtures or steam units, a vapor-impermeable sheet membrane system is heavily preferred to block microscopic water vapor from migrating into surrounding dry-zone framing.
3. The Multi-Layer Defense Protocol
A bulletproof wet room installation follows a strict sequence of structural layers designed to isolate moisture effortlessly:
1. Solid Subfloor Preparation: The substrate must be completely rigid and deflection-free. For tile and stone installations, subfloors must meet an L/360 deflection standard (or L/720 for natural stone) to prevent movement from splitting the waterproofing layers.
2. Sloped Mortar Bed or Pre-Sloped Pan: Water must never be allowed to pool. A minimum 2% slope (1/4 inch per linear foot) toward the drain assembly ensures immediate evacuation.
3. Primary Waterproofing Barrier: The liquid or sheet membrane envelope is meticulously applied across the entire floor slab and extended up the shower walls to a height of at least 72 inches (or fully to the ceiling in luxury wet rooms).
4. ANSI A118.15 Thin-set Mortar: High-performance, polymer-modified mortars secure the decorative custom tile while enduring continuous thermal cycling and submersion.
4. Quality Assurance: Flood Testing Requirements
The ultimate separator between amateur renovations and elite engineering is the implementation of a physical flood test before a single piece of tile is laid. Per IPC (International Plumbing Code) guidelines, the shower drain is plugged, and the entire sloped basin is filled with water to a depth of at least 2 inches at the threshold.
The water level is marked and left undisturbed for a minimum of 24 hours (ideally 48 hours). A successful test shows zero drop in the water line and zero moisture transfer on the floor joists below, giving you absolute validation that your home structure is safe for decades to come.
Conclusion
Investing in premium stone tile and luxury plumbing fixtures is meaningless if the infrastructure behind the scenes cannot manage water load. By understanding critical structural failure points, choosing high-performance membranes, and insisting on verified flood testing, you ensure your open-concept wet room remains a secure, mold-free sanctuary. True structural defense is an investment that pays dividends in peace of mind for the next 20 years.