
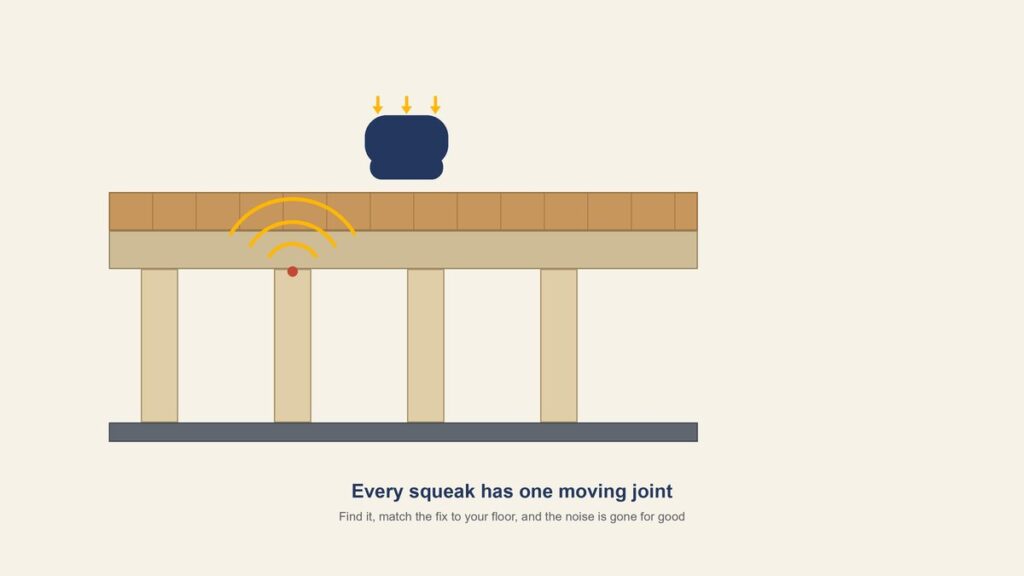
There’s a board in your hallway that announces you to the entire house. You’ve stepped over it for months, maybe years. At some point you searched for a fix and found the usual lineup — sprinkle baby powder, drive a screw, buy a kit — and if you tried one, there’s a decent chance the squeak is still there.
Here’s the part almost every article skips: those fixes all work. They just work on different squeaks. A floor squeak is not one problem. It’s a symptom of a specific joint moving — and there are at least four different joints in a wood floor system that can move. Drive a screw into a squeak caused by two floorboards rubbing against each other and you’ve put a hole in your floor for nothing.
So this guide on how to fix squeaky floors starts where a flooring contractor starts: with the diagnosis. We’ll walk through where squeaks actually live inside the floor sandwich, how to pinpoint yours before you buy anything, and then the right repair for each situation — hardwood from above, under carpet, from below through a crawl space, and the no-drill options. We’ll also cover the honest answer to the question behind the question: when is a squeak just annoying, and when is it your house telling you something?
Key Takeaways
- A squeak is a connection problem — wood moving against a fastener or another piece of wood. The right fix depends on which joint is moving, not on which trick is most popular online.
- There are four common squeak sources: subfloor lifting off the joists, floorboards rubbing on the subfloor, nails working loose in their holes, and missing blocking or loose hardware below.
- Access decides the method. Homes with crawl spaces — which includes much of the older East Bay housing stock — can usually be fixed from below without touching the finish floor at all.
- Expect roughly $150–$500 for a pro to handle a few isolated squeaks, and more when carpet lifting, subfloor work, or structural framing gets involved.
- Squeaks that come and go with the seasons are almost always harmless wood movement. Squeaks paired with sloping, bounce, or doors that suddenly stick deserve a professional look.
What This Guide Covers
- Why Wood Floors Squeak in the First Place
- The Four Places a Floor Squeak Actually Lives
- How to Pinpoint the Squeak Before You Fix Anything
- Matching the Fix to Your Floor Type and Access
- How to Fix Squeaky Hardwood Floors From Above
- How to Fix Squeaky Floors Under Carpet
- How to Fix Squeaky Floors From Below
- How to Fix Squeaky Floors Without Drilling
- When a Squeak Points to Something Structural
- What Squeaky Floor Repairs Cost in the Bay Area
- Get the Squeak Diagnosed Once and Fixed for Good
- FAQs
Why Wood Floors Squeak in the First Place
Wood never stops moving. It takes on moisture when indoor air is humid and gives it back when the air dries out, swelling and shrinking a little with every cycle. In the Bay Area that cycle is real: winter rains and summer drought outside, and a heating season that dries out the air inside. Every year your floorboards, subfloor panels, and joists each shrink and swell by slightly different amounts, because they’re different pieces of wood installed in different directions.
That movement is why fasteners lose their grip. A smooth nail driven forty years ago has been worked back and forth through thousands of humidity cycles, and each cycle backs it out a hair. Eventually the nail no longer clamps the subfloor tight to the joist — it just sits in its hole. Now there’s a gap measured in millimeters, and every footstep closes it and lets it spring back. Wood sliding against wood, or wood sliding against a nail shank, makes exactly the chirp and creak you’re hearing.
This is worth understanding because it reframes the problem. The wood isn’t wearing out, and your floor isn’t failing. A squeak means one connection somewhere in the floor system has gone loose. Fixing it means finding that connection and clamping it back together — or lubricating it, if clamping isn’t on the table. It also explains the seasonal pattern so many homeowners notice: interior air is driest during the heating months, gaps are at their widest, and squeaks are at their loudest. The EPA advises keeping indoor humidity below 60 percent, ideally between 30 and 50 percent, and floors that live in that band simply move less.
The Four Places a Floor Squeak Actually Lives
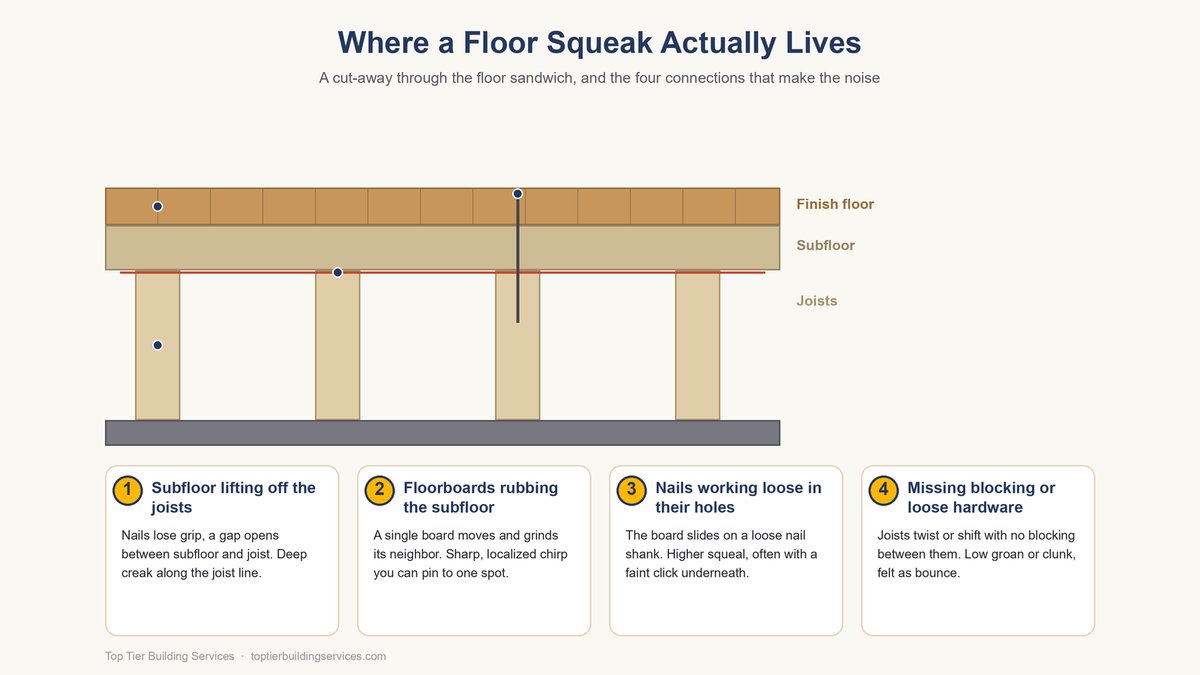
Picture your floor as a sandwich. On top is the finish floor — hardwood, carpet over pad, tile over backer. Under that is the subfloor, sheets of plywood or OSB (or diagonal planks in older homes around Berkeley and Alameda). The subfloor sits on joists, the framing lumber that spans your foundation or the story below. A squeak lives at one of the joints between those layers, and each one calls for a different repair.
1. The Subfloor Lifting off the Joists
How This Squeak Happens
The nails holding the subfloor down to the joists lose their withdrawal grip over years of wood movement, and a small gap opens between the bottom of the subfloor and the top of the joist. This is the single most common squeak source in homes built before construction adhesive became standard practice, which covers most pre-1980s Bay Area housing.
What It Sounds Like
A deeper creak or groan that you can trigger from a broad area rather than one single board, often loudest along a straight line — because it follows the joist. Step on either side of the loose spot and you’ll usually still get the noise.
The Fix That Holds
Re-clamp the subfloor to the joist with screws from above, or shims, adhesive, and cleats from below. Screws beat nails here every time because threads resist withdrawal; a renailed squeak is a squeak with an appointment to come back.
2. Floorboards Rubbing Against the Subfloor
How This Squeak Happens
Solid hardwood strips are nailed through their tongues into the subfloor below. When boards shrink or the flooring nails loosen, individual boards get a whisper of vertical play, and the tongue of one board grinds against the groove of its neighbor or against the subfloor itself.
What It Sounds Like
A sharp, localized chirp or bird-like squeak you can pin to one or two specific boards, sometimes reproducible by pressing down with one hand. It moves with the board, not with the joist line, which is your main clue that this isn’t a framing-level problem at all.
The Fix That Holds
Lubricate the joint with powdered graphite or talc for a fast, drill-free fix, or lock the board down with angled trim-head screws if the chirp keeps returning. This is the one squeak family where the famous baby-powder trick genuinely earns its reputation.
3. Nails Working Loose in Their Holes
How This Squeak Happens
A smooth-shank nail that has lost its clamping force stays in the wood but no longer holds anything tight. The floor flexes under load, and the wood slides up and down against the nail shank itself — metal against wood, hundreds of times a day.
What It Sounds Like
A higher-pitched squeak or squeal, often with a faint clicking or ticking underneath it as the board taps the nail head. If you hear something closer to a click than a groan, suspect the fastener itself rather than two big pieces of wood rubbing together.
The Fix That Holds
The nail can’t be tightened, so it has to be outvoted. Drive a screw an inch or two away to clamp the layers tight, and the nail stops moving in its hole. Pulling old nails out of finished floors usually causes more damage than leaving them clamped in place.
4. Missing Blocking and Loose Hardware Below
How This Squeak Happens
Joists themselves can move — twisting slightly, flexing sideways, or shifting in metal joist hangers that were never fully nailed off. Long joist spans without solid blocking or bridging between them are the usual suspects, and every bit of that framing movement telegraphs up into the floor above.
What It Sounds Like
A low groan, clunk, or thud rather than a chirp, often felt as a slight vibration or bounce in the floor as much as heard. If the light fixture downstairs hums when someone walks upstairs, you’re likely in this category, not in the flooring at all.
The Fix That Holds
Add solid 2x blocking between the joists at mid-span, snug loose bridging, and fully nail off any joist hangers with the hardware nails they were designed for. This is framing work, and it’s also the squeak family most worth showing to a professional before treating it as cosmetic.
How to Pinpoint the Squeak Before You Fix Anything
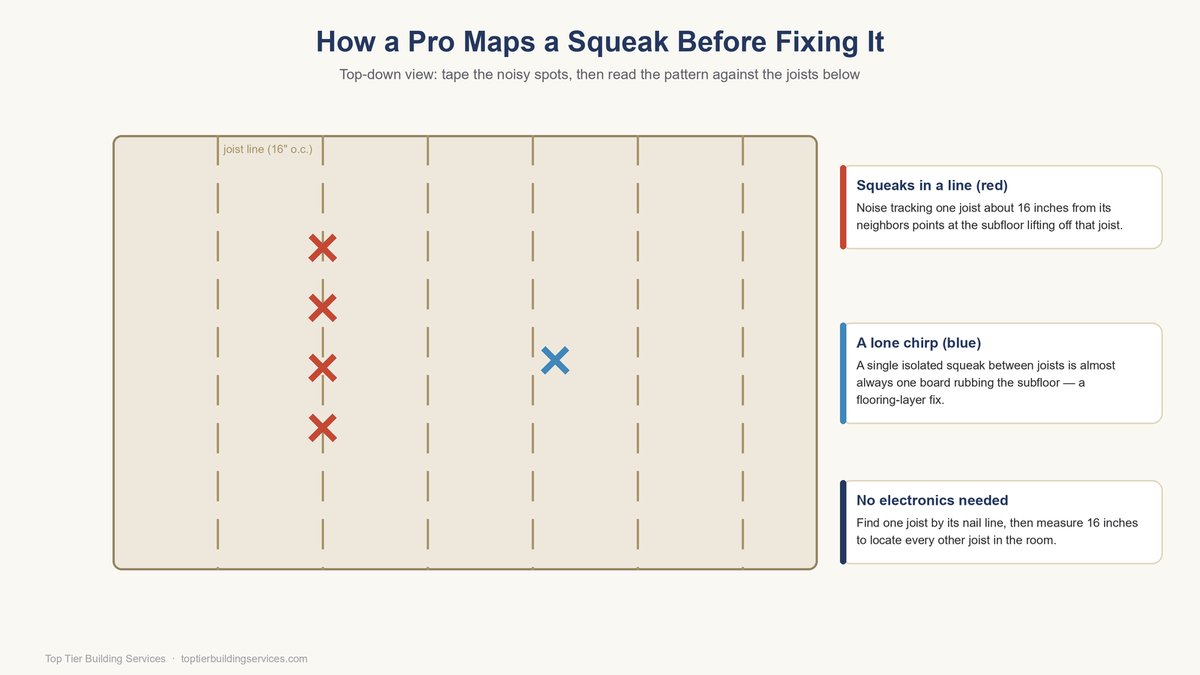
Twenty minutes of diagnosis saves the misfire cycle most homeowners fall into — buying three different products for three different squeak types and hoping one matches. Here’s how a flooring crew actually locates a squeak.
First, map it. Walk the room in a grid, slowly, shifting your full weight on each step, and mark every noisy spot with painter’s tape. You’re looking for the pattern, not just the spots: squeaks in a straight line about 16 inches apart from their neighbors are tracking a joist. A single chirping board in isolation points at the flooring layer. A whole zone that crunches points at the subfloor.
Second, get eyes below if you possibly can. This is where Bay Area homeowners with raised foundations have a genuine advantage: send a helper into the crawl space or basement with a flashlight while you work the squeaky spot from above. If they can see the subfloor flexing on the joist, or daylight between the two, the diagnosis is done — and the fix can happen entirely from below. Watch whether the joist itself moves, too; that distinguishes squeak family four from family one.
Third, note the timing. A squeak that arrived with the heating season and fades in spring is humidity-driven wood movement. One that appeared suddenly, is getting steadily worse regardless of season, or showed up after a nearby remodel or a decent-sized earthquake deserves the structural checklist later in this guide rather than a tube of adhesive.
Matching the Fix to Your Floor Type and Access
Diagnosis tells you which joint is moving. Your floor covering and your access decide which repair you can actually reach it with. This is the decision most guides skip, and it’s why the same advice that works in a Midwest basement house falls flat in a Peninsula slab ranch. Here’s the map.
Two Bay Area notes on that table. First, if your home is a pre-war bungalow in Oakland, Berkeley, or Alameda, odds are good you have a raised foundation and a workable crawl space, which makes the from-below column your friend. Second, if you’re in a slab-era ranch — including the Eichler stock on the Peninsula and in the South Bay — there is no “below,” and a squeak lives entirely in the flooring layer or its fasteners, which actually narrows the diagnosis for you. For the bigger picture on how these floor assemblies go together in local homes, our Bay Area flooring installation guide walks through each system layer by layer. Tile is the one covering you can’t touch from above without damage — it’s bonded to a mortar bed over backer board, which our guide to hardwood, LVP, tile, and stone flooring covers material by material, and it’s why a squeak under tile is a from-below job.
How to Fix Squeaky Hardwood Floors From Above
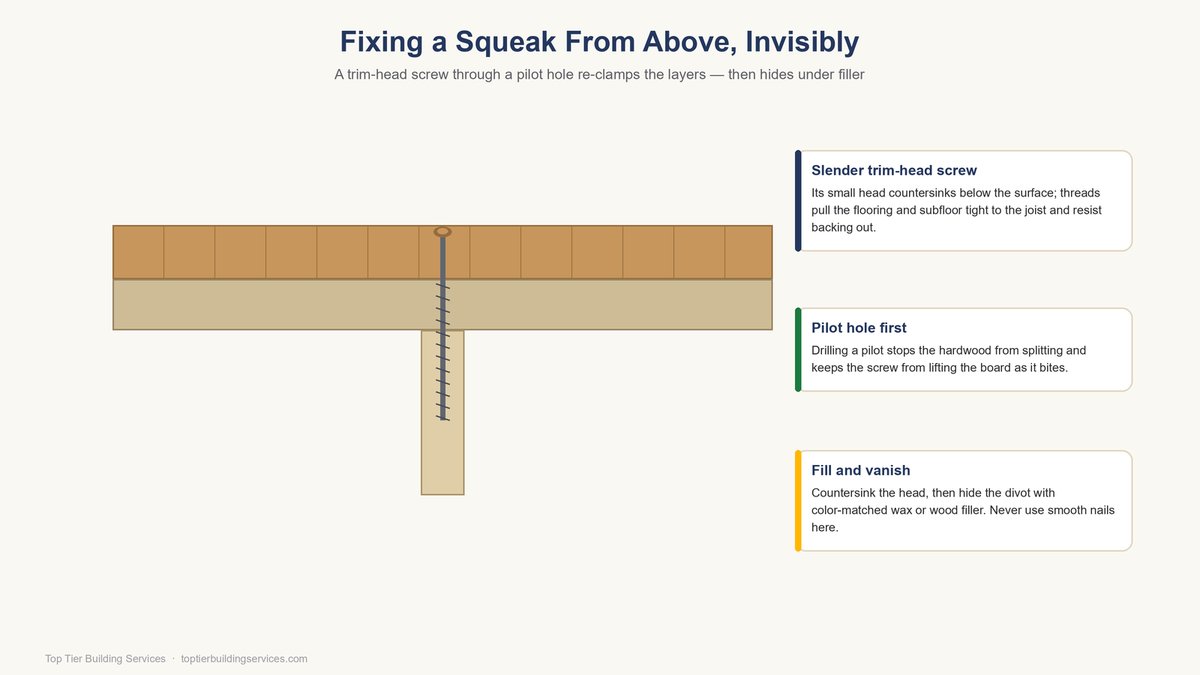
When there’s no access below, you repair through the finish floor — and the whole game is doing it invisibly. Done right, the repair disappears; done carelessly, you trade a squeak for a scar you’ll see for the life of the floor.
Locate the joist nearest the squeak using the nail lines or a stud finder, then drive a trim-head screw — the slender-headed type made for finish work — through a pilot hole, through the flooring and subfloor, and into the joist. The pilot hole matters twice over: it prevents the hardwood from splitting, and it keeps the screw from lifting the board as the threads bite. Countersink the head just below the surface and fill the divot with color-matched wax or wood filler. For squeaks between joists, drive two screws at opposing angles through the flooring into the subfloor so they clamp against each other.
If the squeak is the sharp board-to-board chirp from family two, skip the screws entirely and start with lubricant — that repair is covered in the no-drilling section below, and it costs about five dollars. And if you’re staring at a floor with dozens of squeaks, cupped boards, and worn finish, it’s worth an honest moment with the math: past a certain density of repairs, refastening or replacing the floor beats chasing squeaks one screw at a time. Our breakdown of what new flooring costs in the Bay Area shows what that decision actually looks like in current numbers.
How to Fix Squeaky Floors Under Carpet
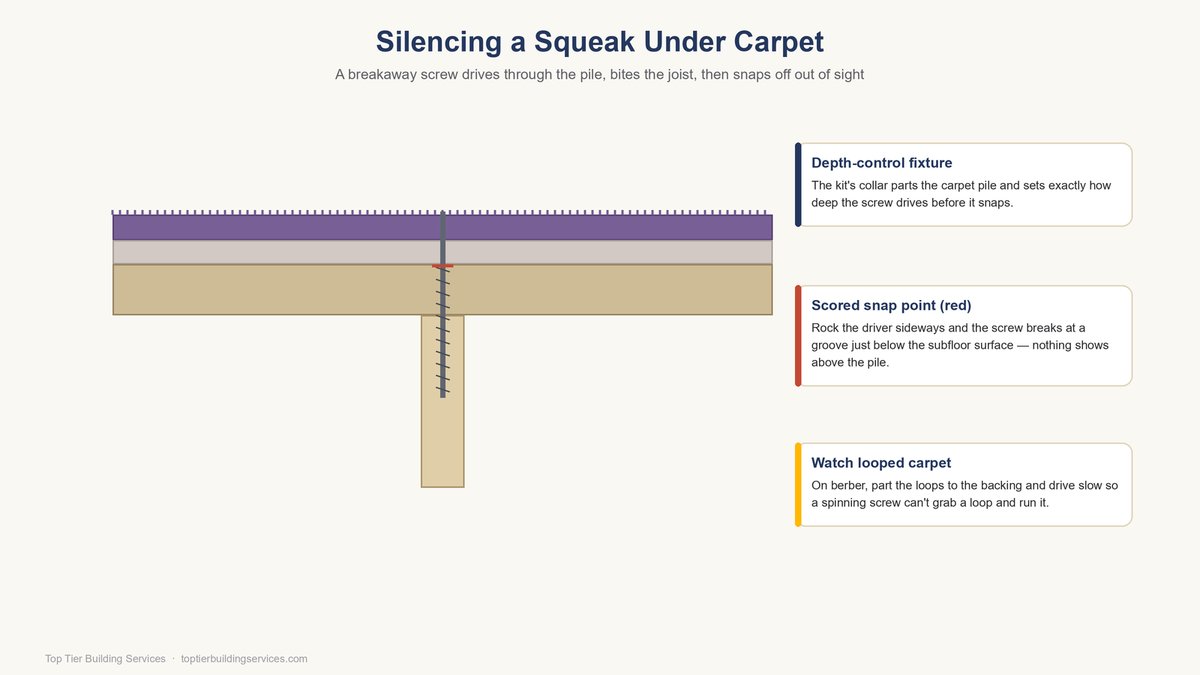
Carpet hides the floor, which sounds like a problem but is actually a gift: you can fasten aggressively and nobody will ever see the repair. The trick is getting through the carpet without damaging it.
The standard method is a breakaway screw kit. These kits include a depth-control fixture that grips the carpet pile out of the way and a scored screw that snaps off cleanly below the top of the subfloor once driven. Find the joist through the carpet — a knock test works, a stud finder set for deep scan works better, and the 16-inch-spacing trick from earlier fills in the rest — then drive the screw through the fixture, rock it sideways, and the shank snaps off invisibly under the pile. A few screws along the squeaky stretch of joist usually kills the noise entirely.
For a room-wide crunch rather than a spot squeak, the honest repair is bigger: detach the carpet from the tack strip along one wall, roll it and the pad back, screw the subfloor down properly across the whole affected area with construction screws into every joist, then re-stretch the carpet. It’s a half-day job and the re-stretch takes either a rented kicker or a carpet installer, but it fixes fifty squeaks in the time the through-carpet method fixes five.
How to Fix Squeaky Floors From Below
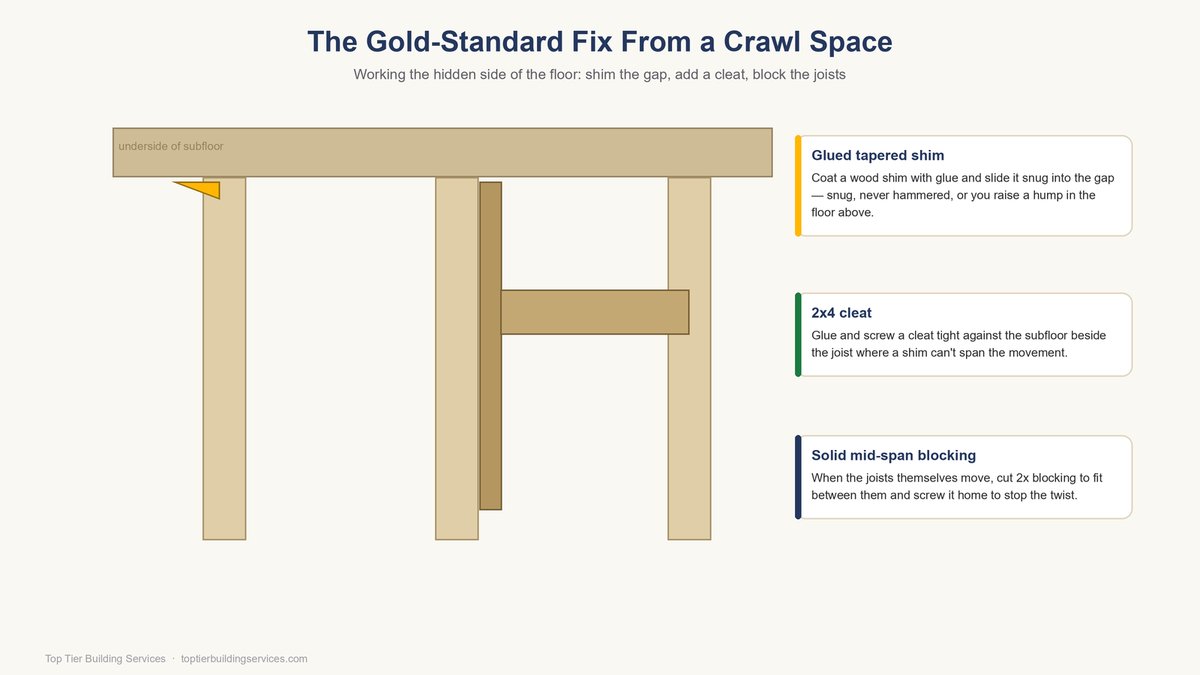
If you have a crawl space or unfinished basement, from below is the gold-standard repair: every fix happens on the hidden side, the finish floor is never touched, and you can see exactly what you’re fixing instead of guessing through the covering. Given how much of the East Bay’s older housing sits on raised foundations, this is the method our crews use most.
Have your helper walk the squeaky spot while you watch from below with a good light. Where you see the subfloor moving against a joist, work through the escalation. Start with a shim: coat a tapered wood shim with carpenter’s glue and slide it into the gap until it’s snug. Snug, not forced — hammering a shim in lifts the floor above and creates a hump you’ll feel underfoot. For gaps that run a foot or more along a joist, a shim parade is the wrong tool; run a generous bead of subfloor-rated construction adhesive into the gap instead and let it cure into a full-length cushion.
For movement a shim can’t stabilize, add mechanical clamping. Screw a 2×4 cleat snug against the underside of the subfloor alongside the joist, gluing and screwing it to both. Steel squeak-repair brackets do the same job where a cleat won’t fit. If the joists themselves are moving — family four — cut solid 2x blocking to fit between them at mid-span, glue the contact edges, and screw it home. And while you’re down there, look around: sagging insulation, dark moisture staining, or powdery wood damage near the squeak zone is exactly the kind of early warning a crawl space trip exists to catch.
How to Fix Squeaky Floors Without Drilling
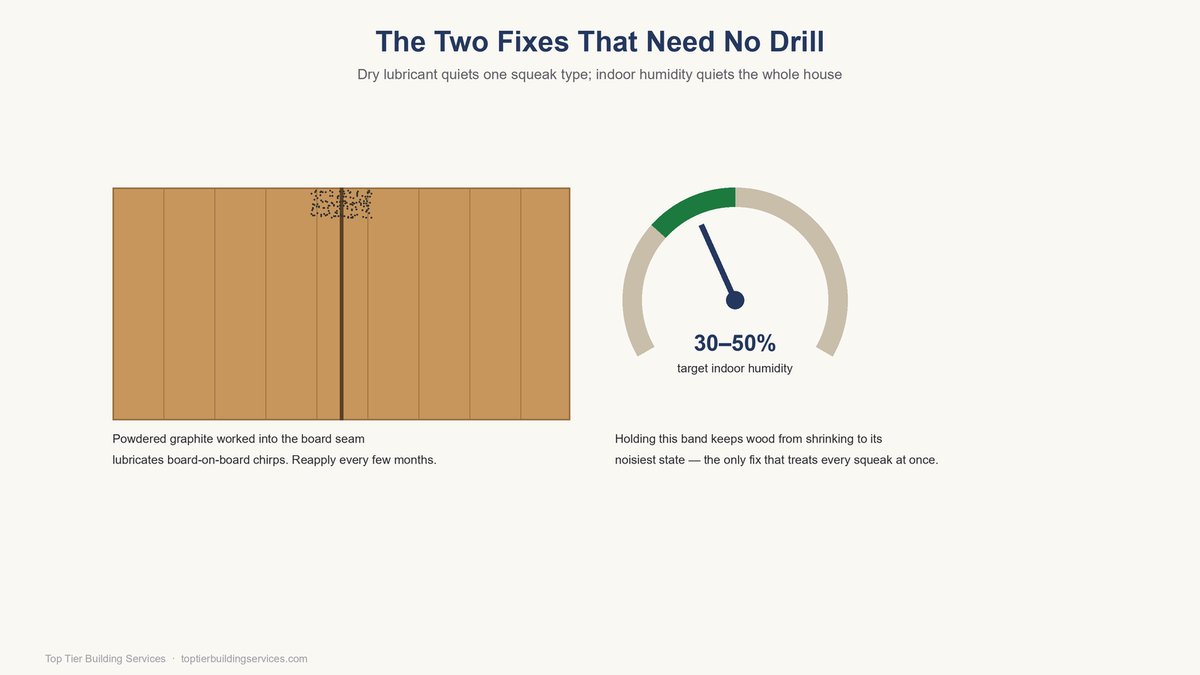
Sometimes you can’t put a fastener in the floor — rental agreements, a finish you won’t risk, tile overhead, or you simply want the squeak quieter today with zero tools. There are real no-drill options; the honesty they come with is that they treat friction, not looseness, so some are maintenance rather than cures.
For board-to-board chirps in hardwood, dry lubricant is legitimately effective. Work powdered graphite or unscented talc into the seams around the noisy board, lay a cloth over the area, and walk the powder down into the joint until the chirp fades. Vacuum the excess. Expect to repeat it every few months — you’re lubricating a moving joint, not stopping the movement. Skip liquid lubricants and household oils entirely: they attract grime into the seams, can swell the wood, and can wreck the finish along the joint line.
The other genuine no-drill lever is humidity. Because squeak gaps open when interior air dries out, holding your home in that 30–50 percent relative-humidity band with a humidifier during the heating months keeps the wood from shrinking to its noisiest state. It’s the only fix on this page that treats every squeak in the house at once, and it’s also the best prevention for the floor you haven’t installed yet. What no-drill methods can’t do is fix a loose subfloor: if the diagnosis from earlier pointed at family one, three, or four, the floor needs clamping — from below if drilling from above is off the table.
When a Squeak Points to Something Structural
Let’s keep the base rate honest first: the overwhelming majority of floor squeaks are cosmetic. Loose connections, seasonal wood movement, aging nails — annoying, harmless, fixable. A squeak alone, even a loud one, is not a structural emergency.
The signal to take seriously is a squeak with company. Watch for noise that gets steadily worse regardless of season, paired with a floor that visibly slopes or feels bouncy; doors near the squeak that suddenly stick or swing on their own; fresh drywall cracks radiating from door and window corners; or a squeak zone next to a bathroom or exterior wall, where the quiet cause can be a slow leak softening the subfloor. In a crawl space, dark staining, fungal growth, or wood that crumbles under a screwdriver tip near the squeak means the noise is the least of it.
Two Bay Area specifics belong in this list. Parts of the East Bay sit on expansive clay soils that swell with winter rain and shrink through the dry season, and that annual cycle can work foundations — and the floors above them — enough to open new squeaks each year. And after any earthquake big enough to talk about at work, a new cluster of squeaks along one side of the house is a reasonable prompt for a foundation-and-framing checkup, not a shim run. Note that genuinely structural repairs — sistering joists, replacing damaged framing, foundation work — typically require a permit from your city building department in most Bay Area jurisdictions, which is one more reason that work belongs with a licensed contractor rather than a weekend fix.
What Squeaky Floor Repairs Cost in the Bay Area
Squeak repair is one of the cheaper things you can hire done — the expense lives in the access, not the fix. A screw costs nothing; getting to where the screw needs to go is what you’re paying for. Here’s what the work typically runs in the Bay Area market, where labor rates sit meaningfully above national averages. Treat these as planning ranges, not quotes; every honest number in this trade starts with someone looking at your actual floor.
The quiet cost driver in that table is misdiagnosis. A homeowner who pays for through-carpet screws when the real problem is a rolling joist buys the same squeak twice. So the line item worth asking about is the diagnosis itself: does the estimate include looking below, or only treating the spot you pointed at? Surface-only work is the right call for family-two chirps and the wrong one for family four, and the estimate should say which it assumes.
DIY math, for comparison: a breakaway screw kit runs $20–$30, shims and construction adhesive under $25, graphite a few dollars. If your squeak diagnosis is clear and access is easy, doing it yourself is genuinely reasonable. The cases that justify a pro are tile floors, finished ceilings below, anything structural, and floors where the squeaks are one symptom among several.
Get the Squeak Diagnosed Once and Fixed for Good
A squeaky floor is a small problem with a specific address — one moving joint somewhere in the sandwich of flooring, subfloor, and framing. Find the joint, match the fix to your floor and your access, and it’s gone. Skip the diagnosis, and you join the long tradition of homeowners with a drawer full of squeak products and a hallway that still talks.
If you’d rather have it found and fixed in one visit — or your squeaks come with slope, bounce, or a crawl space you’d prefer never to enter — Top Tier Building Services handles flooring repair and replacement across the East Bay, South Bay, and Peninsula from our Castro Valley headquarters. We’re a licensed general contractor (CSLB #1146790 — you can verify any contractor’s license at the Contractors State License Board), and we’ll tell you plainly whether your floor needs five screws or a real conversation. Reach out for an honest assessment and step quietly again.
FAQs
Are squeaky floors a sign of structural damage?
Usually not. The vast majority of squeaks are loose connections between flooring, subfloor, and joists — cosmetic and fixable. Take a squeak seriously when it comes with company: visible sloping, bounce, doors that stick, fresh drywall cracks, or steady worsening regardless of season. That combination warrants a professional inspection rather than a surface fix.
Why do my floors squeak more in winter?
Heating season dries indoor air, wood shrinks as it loses moisture, and the small gaps at every connection in the floor open to their widest. More gap means more movement underfoot and more noise. Keeping indoor humidity in the 30–50 percent range with a humidifier reduces the seasonal swing and quiets most winter-only squeaks.
How much does it cost to fix squeaky floors?
In the Bay Area, expect roughly $150–$500 for a professional to fix a handful of accessible squeaks, $300–$1,000+ for room-wide refastening under carpet, and $250–$800 for crawl-space repairs from below. DIY materials run under $30 for most methods. Structural repairs or subfloor replacement run well beyond those ranges and start with an inspection.
Can you fix squeaky floors without removing the carpet?
Yes. Breakaway screw kits drive a scored screw through the carpet into the joist, then snap the head off below the subfloor surface, leaving no visible trace. For widespread squeaks, rolling the carpet back and screwing the whole subfloor down is more thorough, but for a few localized squeaks the through-carpet method works well.
What can I sprinkle on hardwood floors to stop squeaks?
Powdered graphite or unscented talcum powder, worked into the seams between the noisy boards, lubricates board-to-board friction and quiets the sharp chirping type of squeak. It’s a maintenance fix — expect to reapply every few months. Avoid liquid lubricants and oils, which attract dirt, can swell the wood, and can damage the finish.
Do squeaky floors mean termites or water damage?
A squeak by itself almost never does — loose fasteners and seasonal wood movement are far more common causes. But squeaks concentrated near bathrooms, kitchens, or exterior walls can accompany a slow leak softening the subfloor, and crumbly or stained framing near a squeak zone in the crawl space is worth a pest and moisture inspection while you’re already looking.