
Most failed refinishing jobs do not fail at the finish. They fail hours earlier, somewhere in the sanding, and nobody finds out until the first coat goes down and the light catches every arc the edger left behind. Finish does not hide what the abrasive did. It magnifies it.
That is the thing to understand before you learn how to refinish hardwood floors: the machine work is the job, and the finish only reveals it. A drum sander takes a sixteenth of an inch out of a board in a moment of inattention. A skipped grit leaves scratches the next paper cannot reach. An edger run at the wrong grit paints permanent cross-grain swirl around every wall.
Key Takeaways
- Sanding, not finishing, is where DIY refinishes die. Grit sequence and edger technique decide the result; finish only reveals it.
- A 3/4-inch solid floor has about a quarter inch of wood above the tongue and a full sand takes roughly 1/32 inch, so it holds four to six refinishes.
- Never skip more than one grit. A 36-grit scratch cannot be erased by 100-grit paper, only buried until finish highlights it.
- The edger cuts cross-grain and must run one grit finer than the drum, then be blended, or every wall gets a permanent swirl halo.
- Dry is not cured. Waterborne takes foot traffic in a day but full hardness in one to two weeks, which is why rugs go down last.
- In pre-1978 houses the EPA lead rule governs anyone you pay to sand, and coastal humidity can stall a waterborne coat for hours.
What This Guide Covers
- What a Sanding Pass Actually Removes From Your Floor
- Choosing Between a Drum Sander and an Orbital
- Working the Grit Sequence That Decides Everything
- Keeping Sanding Dust Out of the Rest of the House
- Choosing a Finish and Living With Its Cure Time
- What Marine Layer Humidity Does to Your Cure Schedule
- Refinishing Hardwood Floors Without Sanding Them
- How Long the Whole Job Actually Takes
- Getting a Straight Answer Before You Rent a Sander
- FAQs
What a Sanding Pass Actually Removes From Your Floor
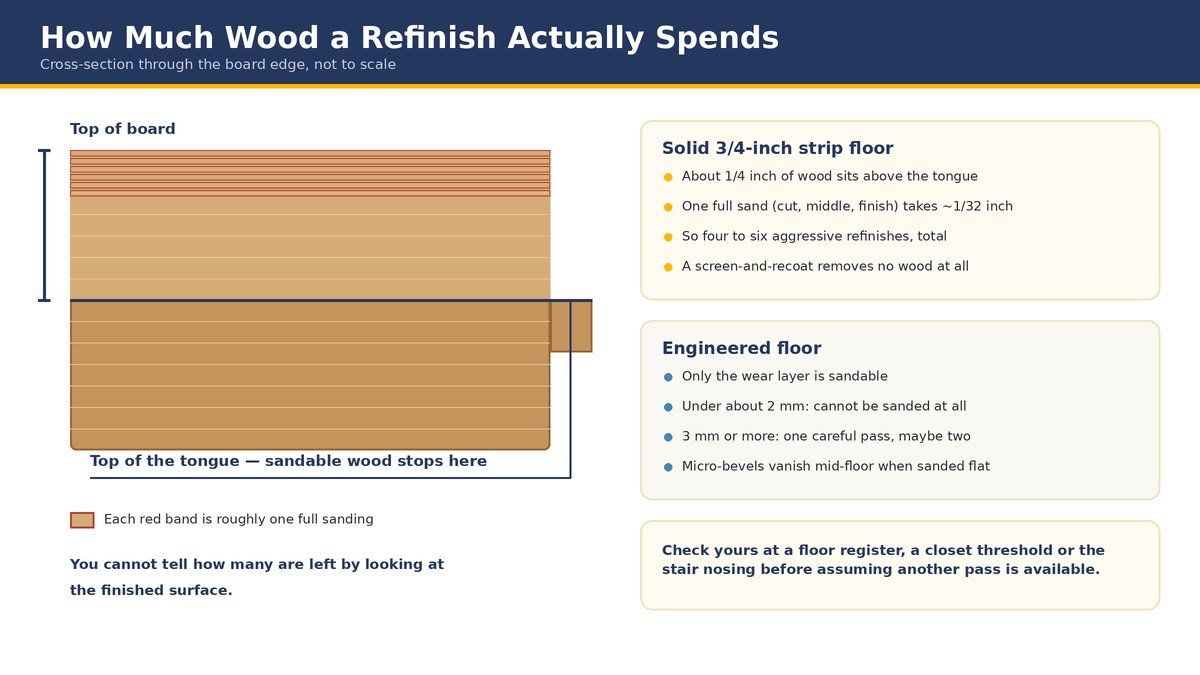
Every refinish is a withdrawal from a finite account, and the balance is smaller than people assume. A 3/4-inch solid strip floor is not 3/4 inch of usable wood. The tongue and groove sit near the middle of the board, and once a sander reaches the top of the tongue the floor is done as a sandable surface. Above that line you have about a quarter of an inch.
A full sand, meaning cut, middle and finish passes together, takes off near a thirty-second of an inch done cleanly and more when the operator is heavy or the boards are cupped. That puts roughly four to six aggressive refinishes in an untouched solid floor. A screen-and-recoat, which never cuts wood, costs nothing from that account.
Engineered floors change the math completely. Only the wear layer is sandable, and it runs from about 0.6 mm on cheap click-together product to 4 mm or more on good material. Below roughly 2 mm, sanding is off the table. At 3 mm and up you get one careful pass, and micro-bevels make even that awkward, because sanding flat removes the bevel mid-floor and not at the edges.
In older houses nobody knows which withdrawal this one is. Pull a floor register and look at the cut edge of the boards, lift a closet threshold, or check the stair nosing. From a crawl space you can often see the underside and count what is there.
Choosing Between a Drum Sander and an Orbital
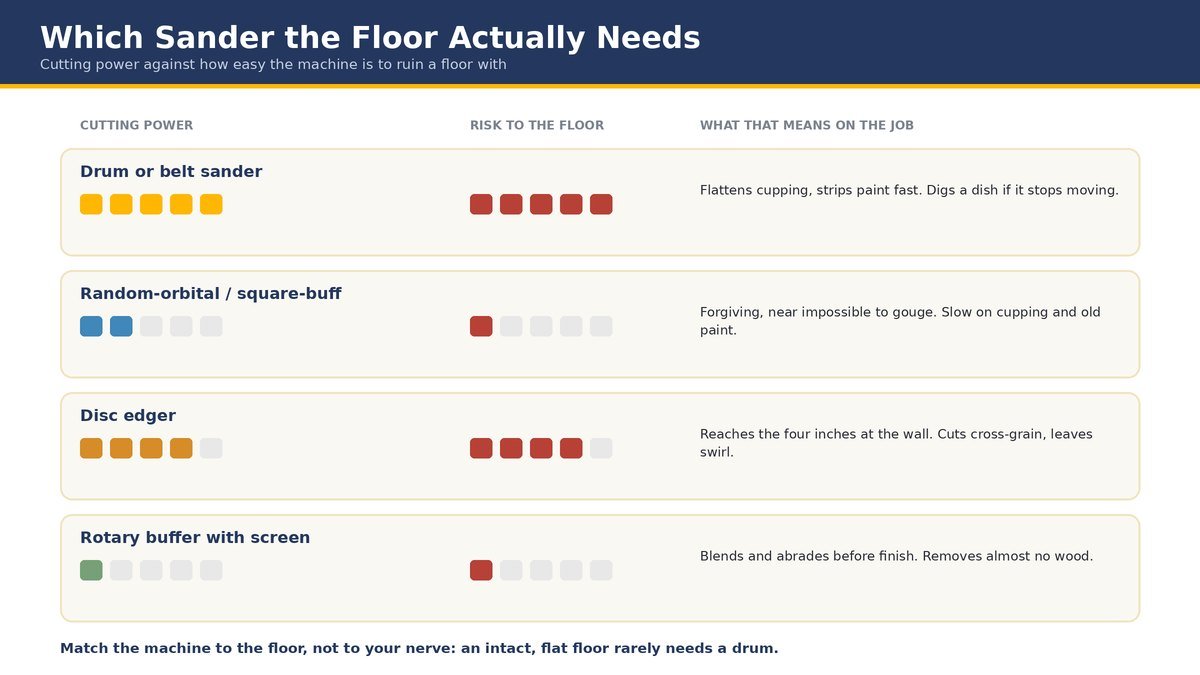
Rental counters carry two very different machines and describe them as interchangeable. A drum sander is a cylinder of abrasive spinning against the floor with real weight behind it, cutting fast and straight along the grain. That is what a cupped, painted or heavily worn floor needs, and what punishes hesitation, because a stationary drum digs a dish in seconds.
A square-buff or random-orbital sander vibrates instead of cutting in one direction. It is forgiving and nearly impossible to gouge, which is why rental yards steer homeowners toward it. The trade is speed: it struggles to flatten cupping or strip old paint, and on a badly worn floor it can spend two days achieving what a drum does in three hours.
Match the machine to the floor, not to your nerve. Light traffic wear over an intact finish rarely needs a drum. A floor cupped by a slow leak, or carrying four coats of 1950s enamel, does — and hiring out the sanding while doing your own finishing is a sensible split.
Working the Grit Sequence That Decides Everything
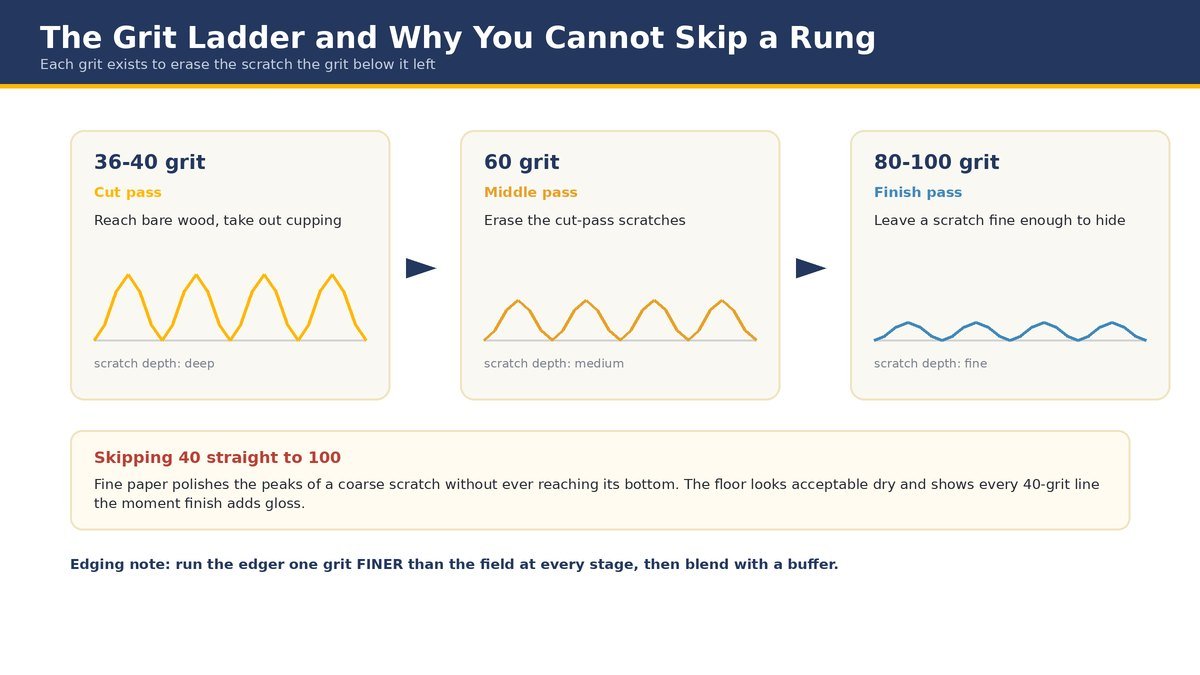
Grit is not a dial for how much you remove. It is a ladder, and every rung exists to erase the scratch pattern the rung below it left. Skipping one hides damage that reappears the instant a wet coat adds gloss.
The Cut Pass That Flattens the Floor
Start at 36 or 40 Grit
The first pass has one job, reaching clean bare wood everywhere and taking out cupping, and on badly uneven floors it runs at a slight angle to the boards before straightening out with the grain. Keep the drum moving before it touches down and after it lifts, and overlap each pass by about a third of the drum width.
The Middle Pass at Sixty Grit
Erase the Cut Pass Scratches
The 60-grit pass exists purely to remove what 36 or 40 left behind, running straight with the grain across the whole floor. Jumping from 40 to 100 is the most common DIY error, because fine paper polishes the peaks of a coarse scratch without reaching its bottom. The floor looks fine dry and terrible under finish.
The Final Pass at Eighty to One Hundred Grit
Match the Grit to the Finish
Stop at 100 for most oak, and at 80 to 100 for softwoods, since sanding finer burnishes the surface and closes the grain so stain and finish cannot key into it. If you are staining, this is where water popping happens, a light even misting that raises the grain so color absorbs uniformly instead of blotching.
Edging Corners and Blending the Field
Run the Edger One Grit Finer
A disc edger cuts in circles while the drum cuts in lines, so its scratch pattern reads as arcs across the grain and appears under finish as a halo along every wall. Work the edger one grit finer than the field at each stage, keep it moving in a slow figure-eight rather than resting flat, and blend the transition with a buffer and fine screen before finishing.
Keeping Sanding Dust Out of the Rest of the House
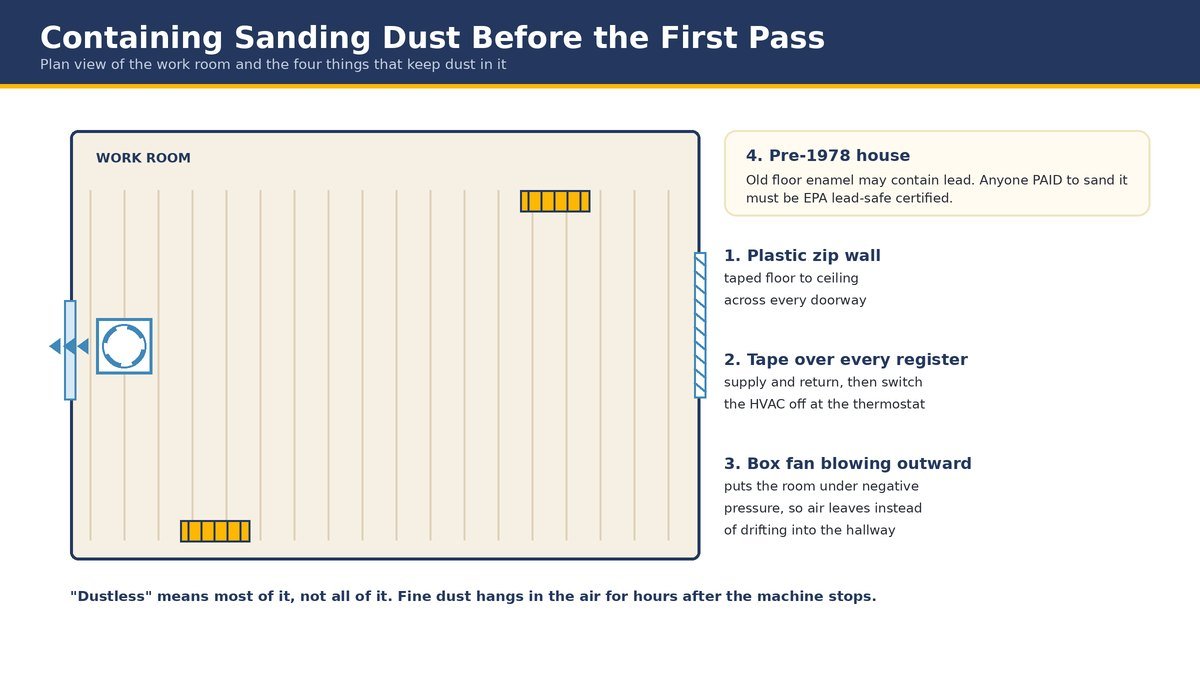
Vacuum-connected sanders are sold as dustless, and the word oversells them. Containment gets most of it, and the fraction that escapes hangs in the air for hours and settles into everything on the far side of the house.
Seal the room before the first pass: plastic sheeting taped floor to ceiling across every doorway with a zipper closure, painter’s tape over every supply and return register, and the HVAC off at the thermostat so the blower is not pushing dust through ductwork. A box fan in a window blowing outward puts the room under negative pressure, so air leaves the work zone instead of entering the hallway.
Wood dust is a respiratory hazard, and in a pre-1978 house it may carry lead from old floor enamel. Wear a fitted N95 at minimum, a P100 respirator wherever lead is possible, and eye and hearing protection at the machine. The EPA’s Renovation, Repair and Painting rule requires anyone paid to disturb painted surfaces in a pre-1978 home to be certified in lead-safe work practices. It does not cover homeowners on their own house, which is precisely why containment matters without a regulator involved.
Choosing a Finish and Living With Its Cure Time
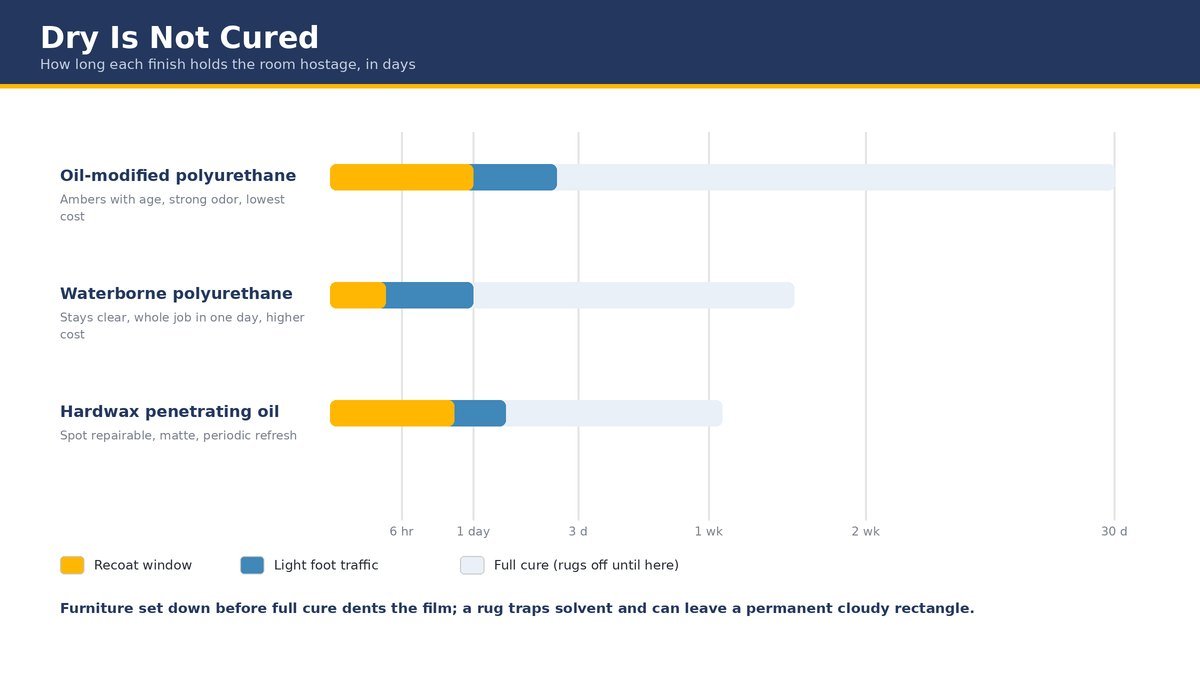
Finish chemistry sets the schedule more than sanding does. Oil-modified polyurethane cures by solvent evaporation and oxidation, is durable and cheap, and wants a day between coats. Waterborne finishes coalesce as water leaves, recoat in hours, and lack the warm tone of old floors. Penetrating hardwax oils sit in the wood rather than on it and can be spot-repaired, which no film finish allows.
The distinction that ruins floors is dry versus cured. Dry means the carrier has left and the surface is not tacky. Cured means the film has finished cross-linking and reached full hardness, days or weeks later. Furniture set down early dents the film under the legs, and a rug over an uncured floor traps solvent, blocks oxygen and leaves a cloudy rectangle that only sanding removes. Walk in socks, keep rugs off until the cure window passes, and start long-term floor care after that.
What Marine Layer Humidity Does to Your Cure Schedule
Manufacturers write drying times for roughly 70 degrees and 50 percent relative humidity, which describes a laboratory and not a summer evening in the Sunset District, Pacifica or Alameda. When the marine layer pushes in and interior humidity climbs into the seventies, a waterborne coat that should be recoatable in three hours is still soft at six, because the water in it has nowhere to evaporate to.
That is a scheduling problem rather than a quality problem, provided you respect it. Coating on time rather than on condition produces soft films, poor inter-coat adhesion and finish that scuffs white within a month. Test with a fingertip in a corner and recoat when the surface is genuinely dry, not when the can’s number says so.
Inland is the opposite. In Livermore, Concord or Morgan Hill in August a waterborne coat can flash off faster than the applicator crosses the room, leaving lap marks where the wet edge died; close the windows and work in smaller sections. Wood moves with all of this too, which is why board gaps close in winter and open in summer, and why filling wide gaps during a dry spell pops the filler out later.
Refinishing Hardwood Floors Without Sanding Them
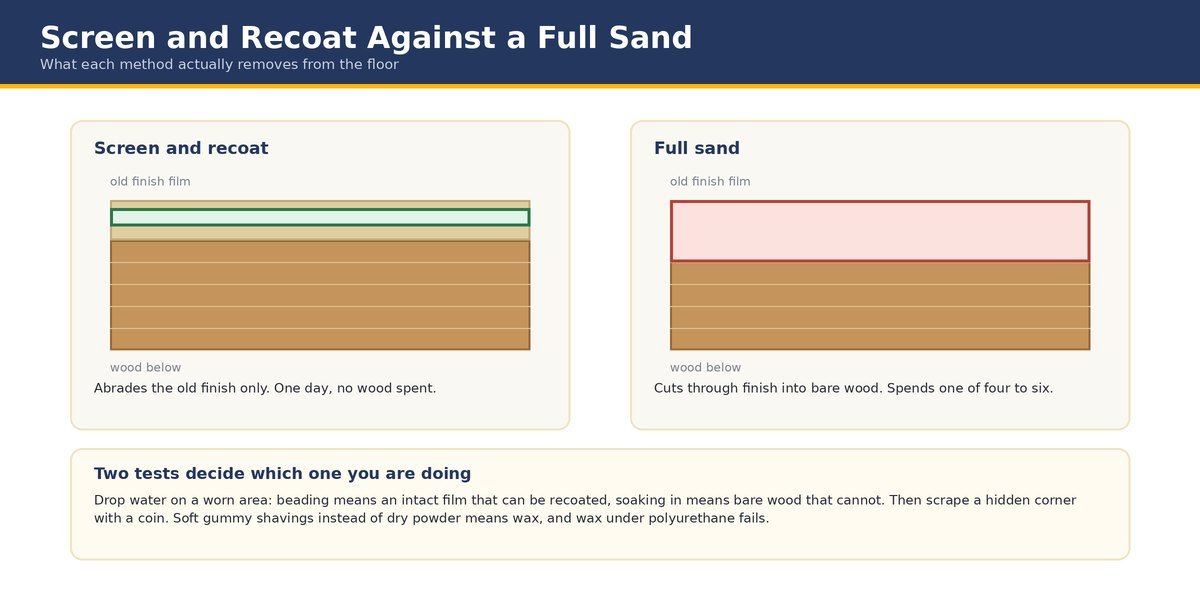
The no-sanding route is real but narrower than the internet suggests. Screening and recoating means abrading the existing finish with a buffer and fine mesh screen, then laying one fresh coat over it. It takes a day, costs a fraction of a full refinish, spends nothing from the wood account, and works only on an unwaxed polyurethane finish that is nowhere worn through to bare wood. Chemical no-sand kits do the same job with an etchant instead of an abrasive, and carry the same limits.
Those conditions do most of the deciding. Any spot worn to raw wood reads as a shadow through the new coat, because a recoat cannot restore color. Wax under polyurethane guarantees adhesion failure, and it is common in houses maintained before the 1970s.
Two tests settle it. Drop water on a worn area: beading means an intact film, soaking in means bare wood. Then scrape a hidden corner with a coin, and if the finish lifts in soft gummy shavings rather than dry powder, there is wax and you are sanding after all.
How Long the Whole Job Actually Takes
The machine work is faster than people expect and the waiting is slower. Sanding a 300 to 400 square foot room through three grits, plus edging and blending, is a full day for someone competent and a day and a half for someone learning. Staining adds a day.
Finishing adds one to three days depending on chemistry. A realistic whole-house sequence is four to seven days of work before you walk on it in socks, another week or two before the film reaches full hardness, and no rugs until then. One room at a time works in an occupied house, with the caveat that a seam shows at the doorway where new finish meets old.
Getting a Straight Answer Before You Rent a Sander
The decision worth making is not which polyurethane to buy. It is whether this floor has enough wood left, whether it is flat enough for a forgiving machine, and whether the finish will take a recoat. Those three answers turn a weekend into a week, and they take ten minutes on site.
Top Tier Building Services is a licensed Bay Area general contractor, CSLB #1146790, and the state’s contractor board is worth reading before hiring at this scale. We refinish floors, and we tell people when a screen-and-recoat is all they need. For an honest read on what your floor has left, contact us, and if you are still pricing the work, our cost to refinish hardwood floors breakdown runs the numbers. If the floor is past saving, what new hardwood costs installed covers the alternative, and the National Wood Flooring Association publishes the standards installers work to.
FAQs
Can you refinish hardwood floors without sanding?
Sometimes. Screening and recoating abrades the existing finish with a buffer and fine screen, then adds one new coat. It works only if the finish is polyurethane, is nowhere worn through to bare wood, and was never waxed. Drop water on a worn spot: beading means a recoatable film, soaking in means bare wood. Chemical no-sand kits share those limits, and deep scratches, cupping or pet stains all mean real sanding.
How many times can hardwood floors be refinished?
A 3/4-inch solid floor carries about a quarter inch of wood above the tongue, and a full sand removes roughly a thirty-second of an inch, so it holds four to six aggressive refinishes over a lifetime. Screen-and-recoats never cut wood and do not count. Engineered floors depend on wear layer: under about 2 mm cannot be sanded, 3 mm or more gets one careful pass.
How long does it take to refinish hardwood floors?
Plan four to seven days of work for a whole floor, one to two for a single room, plus cure time. Sanding a 300 to 400 square foot room through three grits with edging takes about a day, stain adds a day, finishing one to three. Waterborne takes traffic in 24 hours and hardens fully in one to two weeks; oil-modified polyurethane needs about 30 days.
Can you refinish hardwood floors yourself?
Yes, and finishing is the easier half. The risk is the drum sander, which removes wood faster than you can react, and the edger, whose cross-grain swirl only appears after the first coat. A lightly worn, flat floor suits a rented orbital and a careful grit sequence. If it is cupped, painted, or has one refinish left, a mistake costs a replacement.
Can you refinish hardwood floors by hand?
Only on small areas. Hand sanding a whole floor is impractical, but it is correct for closets, stair treads, corners the edger cannot reach and the inches under a radiator. Use a block, follow the grain exactly, and match the field’s grit sequence so those areas take stain at the same rate. Cross-grain hand sanding shows exactly like edger swirl.
Can you refinish hardwood floors one room at a time?
Yes, and in an occupied house it is often the only workable plan. The trade-off is a visible transition at doorways, since sheen and color never match between finishes applied years apart. Stop the new finish at a threshold where the change reads as intentional, and do continuous open-plan areas in one session so no lap mark lands mid-room.